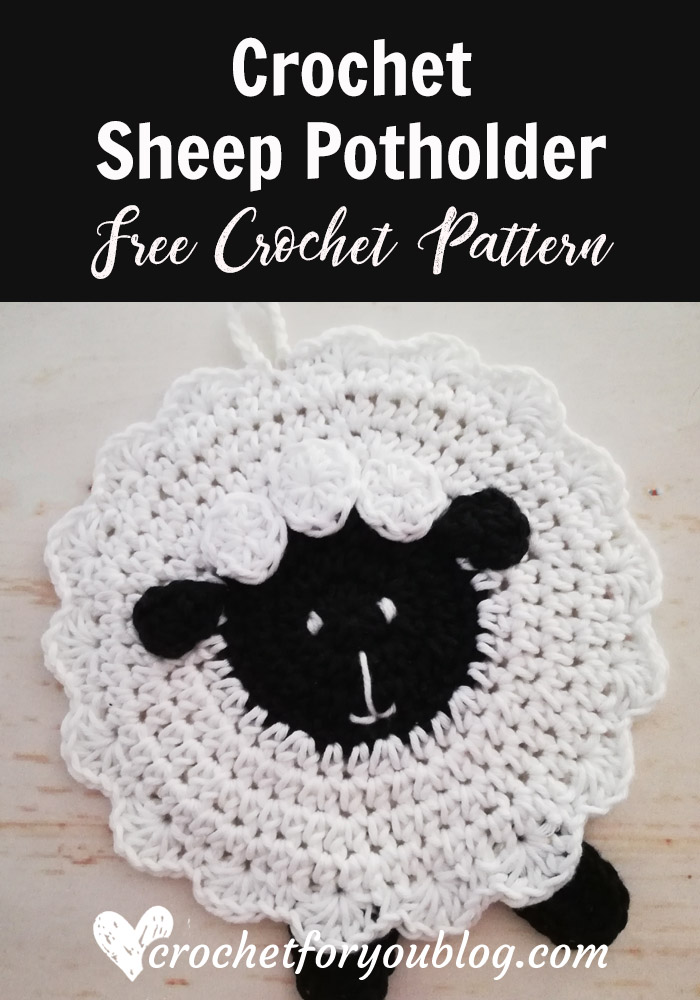
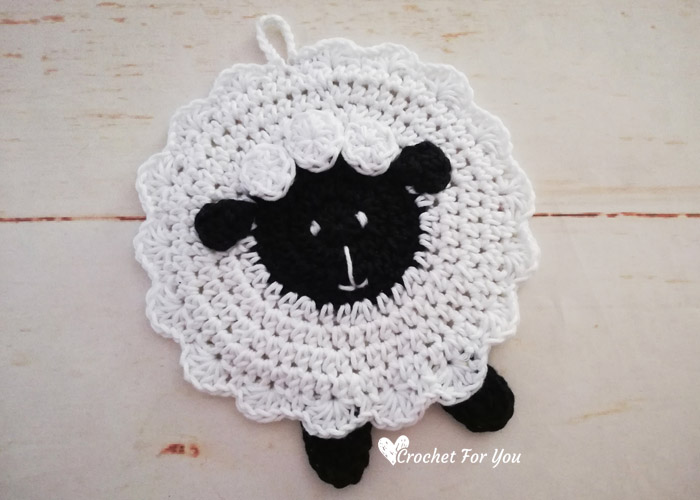
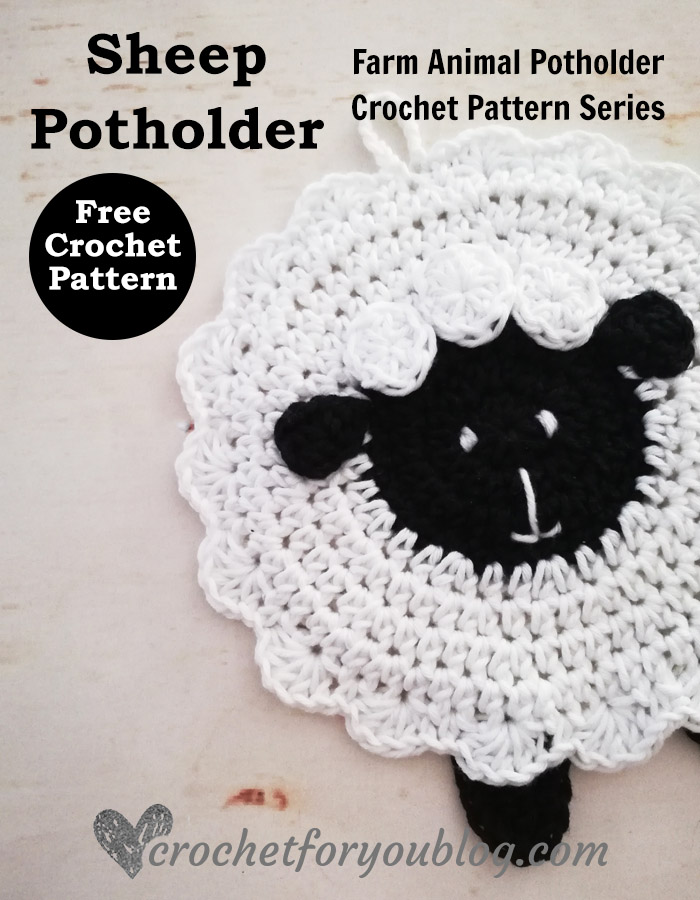
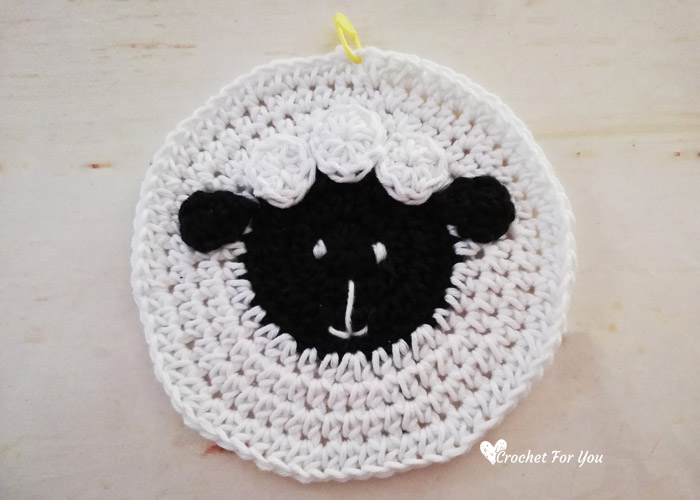
Crochet Sheep Potholder Free Pattern
Crochet Sheep Potholder Pattern by Crochet For You.
Welcome back to the last pattern of the Farm Animal Potholder Pattern Series.
Every Thursday of this month (September 2019) including today I share adorable farm animal potholder crochet patterns. This time I came up with farm animals + potholders theme. I hope you will love making these farm animal themed potholders, don’t you?
At the end of this series, you will have a set of cute farm animal potholders. They are perfect for gift-giving, selling and brighten up your own kitchen space with these cute little faces.
Disclosure This post contains affiliate links.
Updated: Check other Farm Animal Potholder patterns of this series.
Add this pattern to Ravelry queue
Save on Pinterest
As the last pattern, we are going to make cute sheep potholder.
First, you need to make two flat circles. After adding facial features on to the one flat circle you will see a cute sheep face. The next step is joining these two circles together to get a double thickness. And it will cover the yarn ends on the wrong side of the sheep face.
Skill Level: Easy
Finished size: 7.25″ diameter
Materials
4-Medium weight / Worsted / 100% Cotton / 150 total yards
(I used)
- Drops Paris UNI COLOR (Amazon links)
(1 skein of White (No 16) / Small amount of Black (No 15) - H-8 / 5 mm crochet hook
- Tapestry needle
- Stitch markers
- Scissors
Gauge: Gauge is not very important for this pattern.
Abbreviations
- ch = chain
- sl st = slip stitch
- sc = single crochet
- hdc = half double crochet
- dc = double crochet
- st = stitch
- sk = skip
- beg = beginning
- *to ; = repeat * to the instructions.
- [ ] work instructions within brackets as many times as directed.
Notes
- Beg ch does not count as st.
- Gauge is not very important for this pattern.

Crochet Sheep Potholder Pattern
(make 2)
With black color, Make a magic/adjustable ring.
Round 1: ch 1, 10 hdc into the ring, sl st to the first st. (10 sts)
Round 2: ch 1, 2 hdc in each st around, sl st to the first st. (20 sts)
Round 3: ch 1, 2 hdc in first st, *hdc in next st, 2 hdc in next st; repeat * to around, sl st to the first st. (30 sts)
Round 4: ch 1, sc in each st around, sl st to the first st. (30 sts)
With white color
Round 5: ch 1, 2 hdc in first st, * hdc in each of next 2 st, 2 hdc in next st; repeat *to around, sl st to the first st. (40 sts)
Round 6: ch 1, 2 hdc in first st, * hdc in each of next 3 st, 2 hdc in next st; repeat *to around, sl st to the first st. (50 sts)
Round 7: ch 1, 2 hdc in first st, * hdc in each of next 4 st, 2 hdc in next st; repeat *to around, sl st to the first st. (60 sts)
Round 8: ch 1, 2 hdc in first st, * hdc in each of next 5 st, 2 hdc in next st; repeat *to around, sl st to the first st. (70 sts) Fasten off and weave the ends.
Head top (3 circles)
Small (2 circles)
With white color, Make a magic/adjustable ring.
Round 1: ch 1, 8 hdc into the ring, sl st to the first st. (8 sts)
Large (1 circle)
With white color, Make a magic/adjustable ring.
Round 1: ch 1, 10 hdc into the ring, sl st to the first st. (10 sts)
Ears (make 2)
Row 1: ch 3, 2 hdc in last ch from the hook, turn. (2 hdc)
Row 2: ch 2, 2 hdc in each st. (4 hdc) Fasten off and cut the yarn leaving about 8″ long yarn tail.
Legs (make 2)
ch 7, hdc in 3rd ch from the hook, hdc in each st across, turn. (5 hdc)
Work sc around and fasten off and cut the yarn leaving about 8″ long yarn tail.
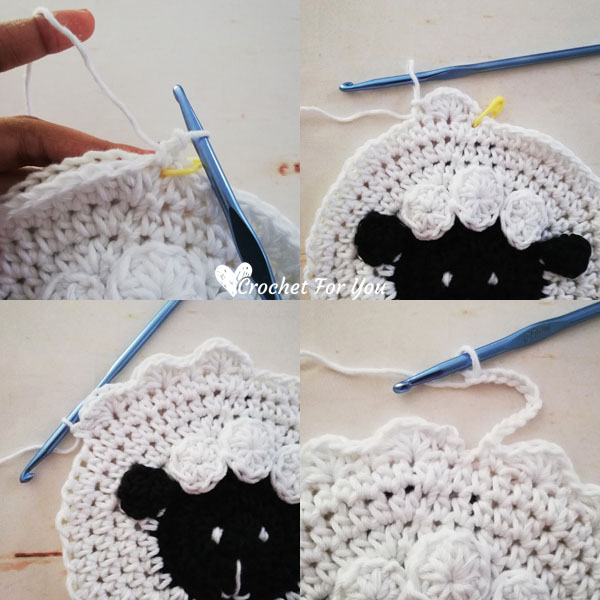
Finishing
Get one circle and attach a stitch marker in one of a stitch. We are going to sew facial features on this marked circle and the marked st for making a hanging loop. So make sure to attach facial features when the marked stitch facing up. Sew 3 circles for the on the head top and ears, (shown below) with the yarn tail and a tapestry needle. With white color yarn, embroider 2 ears and nose on the black circle.
Joining two pieces together
Holding two pieces together right side out, with the same color yarn begins with sc at the top of the st of two circles (don’t forget to insert the hook in that marked st of the one circle),
*sk next st, 5 hdc in next st, sk next st, sc in next st; repeat around until last st, ch 11, sl st to the first st (made a loop), Fasten off and weave the end.
Adding legs
Lastly, sew the legs as shown on the photo.
Hope to see you soon with a new FREE pattern
Until then, Happy Crocheting!!
Share your finished projects of this pattern on Crochet For You FB page.
Happy hooking with Crochet For You!!
Let’s connect and share
Facebook | Pinterest | Twitter | Instagram
All contents include photography and patterns are copyrighted Crochet For You by Erangi Udeshika.
Do not copy, edit, distribute or republish patterns and images in this blog in part or whole as your own. Please, share a direct link to the pattern with others and anywhere else. You are welcome to make and sell finished items using my patterns.
Visit Copyright / Terms of use for more info. Thank you.


5 Comments
cecelia
These potholders are so cute and will make nice gifts for the holiday season. Thank you for your hard work. So sorry for your loss at the passing of your uncle.
Lisa
Your pot holder patterns are adorable! I plan to make them into pillows for my grandson. Thankyou for sharing and making it easy to get the patterns!
Stacie Sherrill
Thank you very much for this pattern. I breezed right through it because it was written so simply.
I cannot however find where it tells about the legs. Shouldn’t I be placing them in between the front and back? Or so they just attach to the back?
Erangi Udeshika
Hi Stacie, I attached the legs from the back side. Because this potholder have 2 pieces to join with 5 dc stitches, you can’t sew the legs between these 2 pieces.
Wynelle
In regards to the ears, does the first chain two count as one of the hdc’s?