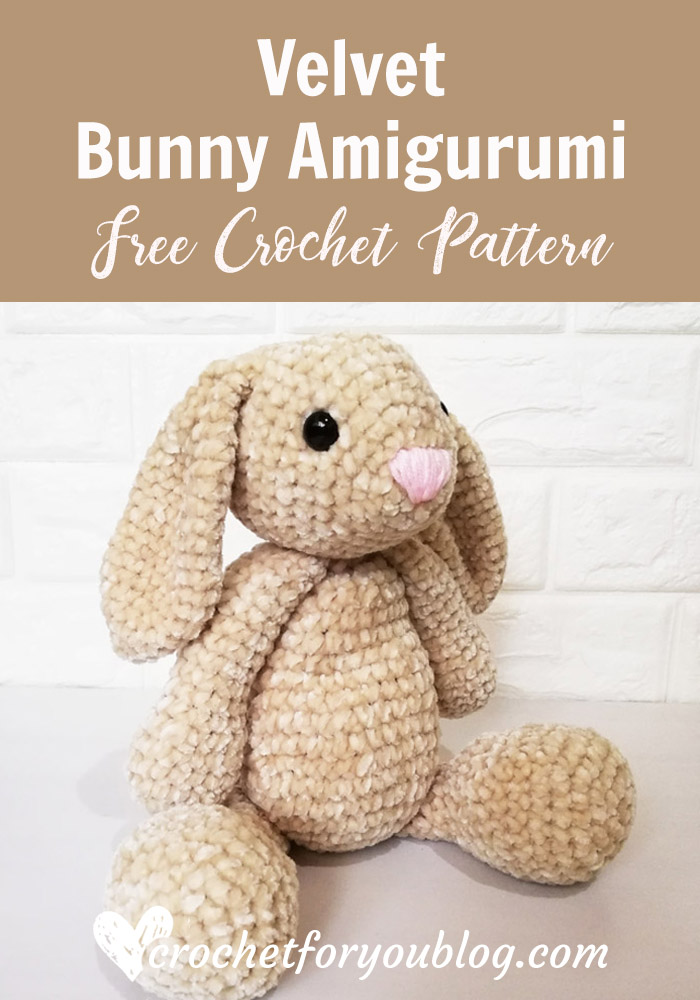
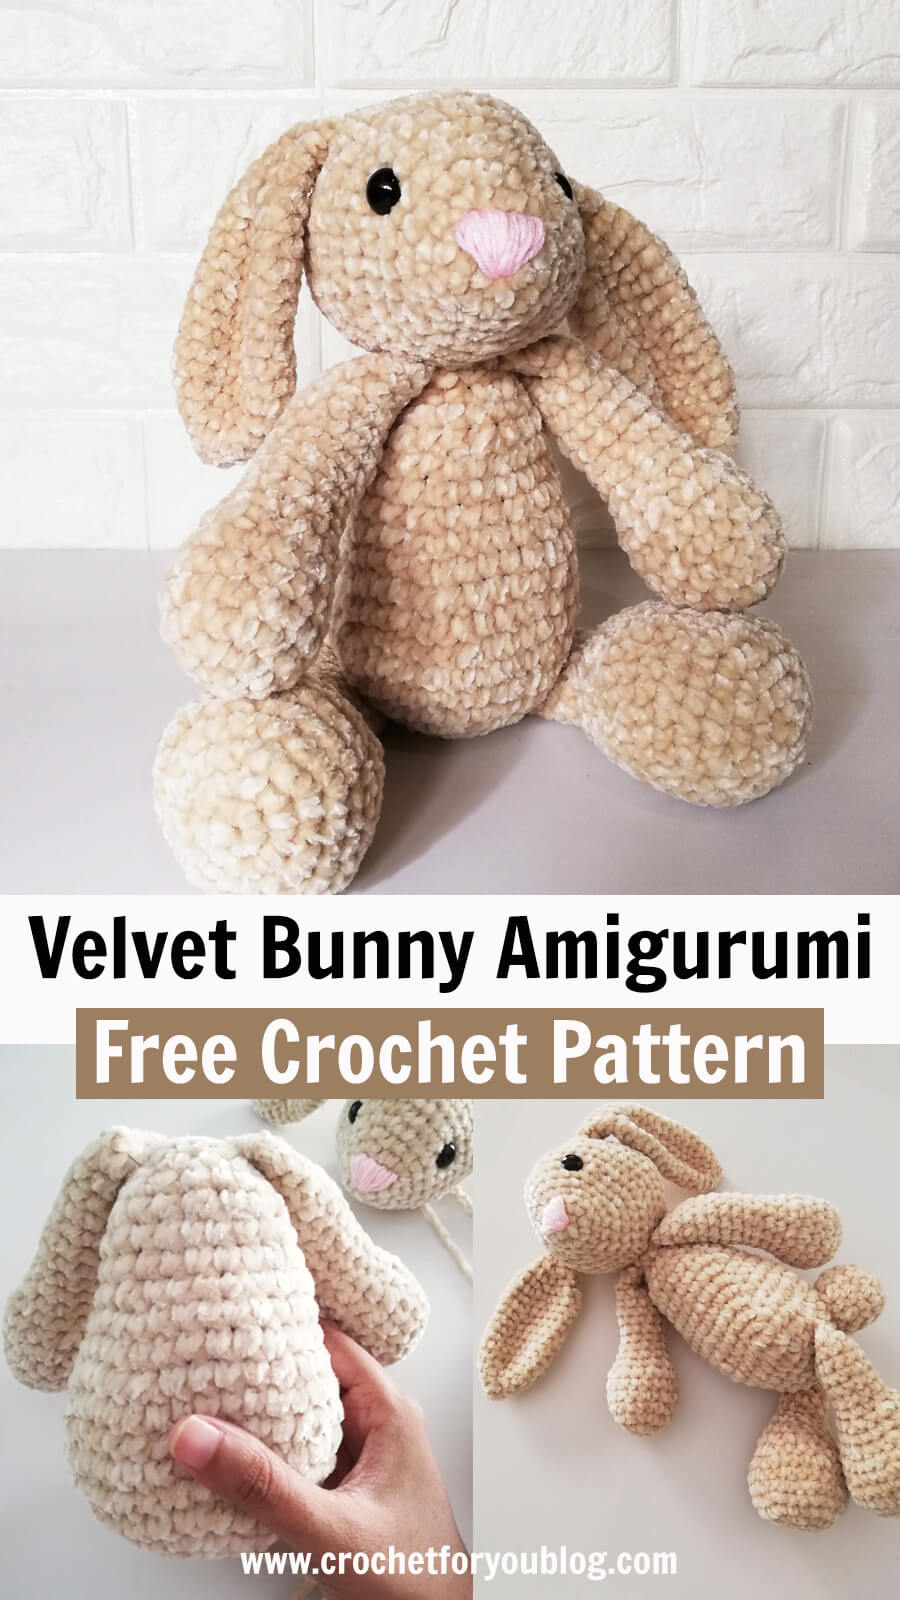
Velvet Bunny Amigurumi Free Crochet Pattern
Velvet Bunny Amigurumi Pattern by Crochet For You
This velvet bunny born as a part of my amigurumi adventure. This year I’m focusing to learn how to crochet/design amigurumi patterns.
I realized the velvet yarn is perfect for making amigurumi. It has that felted texture to make cute and cuddly animals.
Disclosure This post contains affiliate links.

Add this pattern to Ravelry queue
Save on Pinterest
Well, I need to say, I’m not an expert on crochet amigurumi designing. I just start to learn how to crochet and designing these beautiful and creative creatures.
So I used a new way to attach eyes. It makes the shape of rabbit face well and I’m 100% happy about it. Since it is my first time designing amigurumi rabbit face, I thought it is the hardest part. NO… If you already have an experience crocheting amigurumi, I hope you can do it better than me.
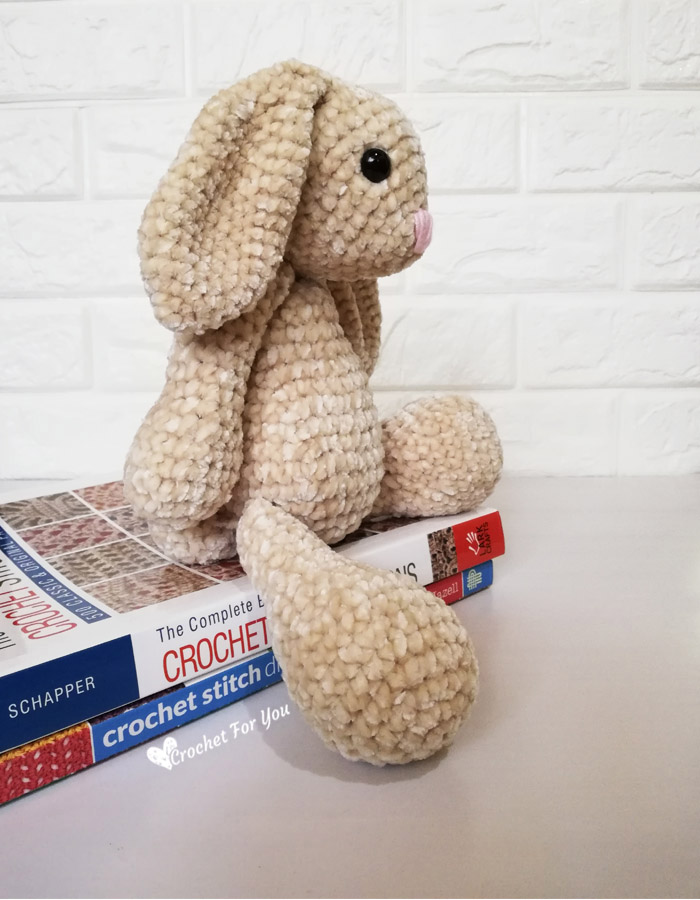
Oh, look! He is sitting now on my favorite crochet books 😀

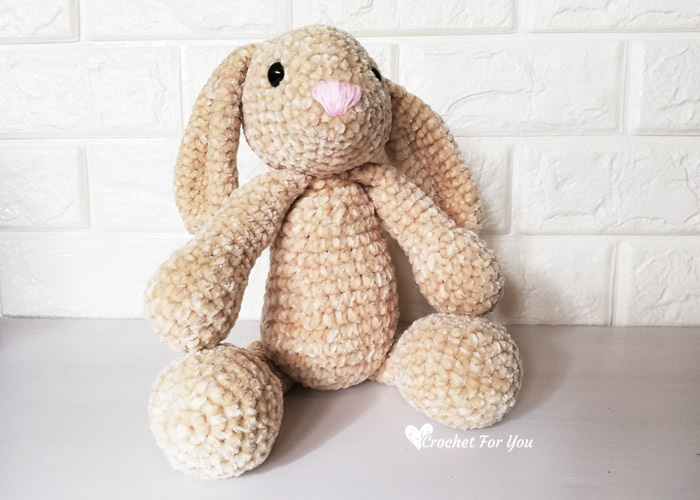
Crochet lovey for little ones to snuggle with 🐰
Cute bunny lovey made with velvet yarns. Kids will love to snuggle with it. This bunny lovey so soft with velvet yarn and gives extra coziness.
Crochet Velvet Bunny Lovey
Skill Level: easy
Finished size: 13.5″ tall
Materials
- Velvet yarn (approx: 250 yards). (Scroll down & read all about the yarn suggestions)
Small amount of Sport or DK weight yarn in pink color- H-8, 5mm crochet hook
- Tapestry needle for weaving ends.
- For eyes, I used 2 shank buttons in black color that have a loop at the back of the button.
Fiberfil - Stitch markers
The velvet yarn I used for this pattern.
This yarn I ordered from eBay, (also available on Amazon) i not from a popular brand. I used Khaki color.
Yarn suggestion
When I checked the gauge, there was a little different between my gauge swatch and Vel-Luxe yarn on the Lion Brand website.
My gauge swatch (4” x 4”) with H-8, 5mm crochet hook was 16 sc x 15 rows. I think Lion Brand Vel-Luxe yarn is perfect for this project than Bernat Velvet yarn.
Gauge: 16 sc x 15 rows = (4” x 4”) with H-8, 5mm crochet hook.
Abbreviations
- ch = chain
- sl st = slip stitch
- sc = single crochet
- dc = double crochet
- st = stitch
- ch-() sp = chain-(number of chain) space
sk = skip- beg = beginning
- *
to ; = work instructions within brackets as many times as directed - [] = work instructions within brackets as many times as directed
- sc inc = 2 sc in one st
- sc dec = crochet 2 sc together (Insert the hook and draw up a loop in each of 2 stitches, yarn over, pull back through all 3 loops on hook at once)
Notes:
- Do not join after each round.
- Always attach the stitch markers on first st in each round.
- For
eyes I used 2 shank buttons in black color that have a loop at the back of the button.
Velvet Bunny Amigurumi Pattern
Head
Round 1: 6 sc into the adjustable ring. (6 sts)
Round 2: sc inc around. (12 sts)
Round 3: sc in each st around. (12 sts)
Round 4: [sc inc, 1 sc] 6 times. (18 sts)
Round 5: [sc inc, sc in each of next 2 sts] 6 times. (24 sts)
Round 6: [sc inc, sc in each of next 3 sts] 6 times. (30 sts)
Round 7: [sc inc, sc in each of next 4 sts] 6 times. (36 sts)
Round 8: sc in each st around. (36 sts)
Round 9: repeat round 8. (36 sts)
Round 10: [sc inc, sc in each of next 5 sts] 6 times. (42 sts)
Round 11: sc in each st around. (42 sts)
Round 12 to 14: repeat round 8. (42 sts) Embroider nose with pink yarn and attach eyes between 7 and 8 rounds.
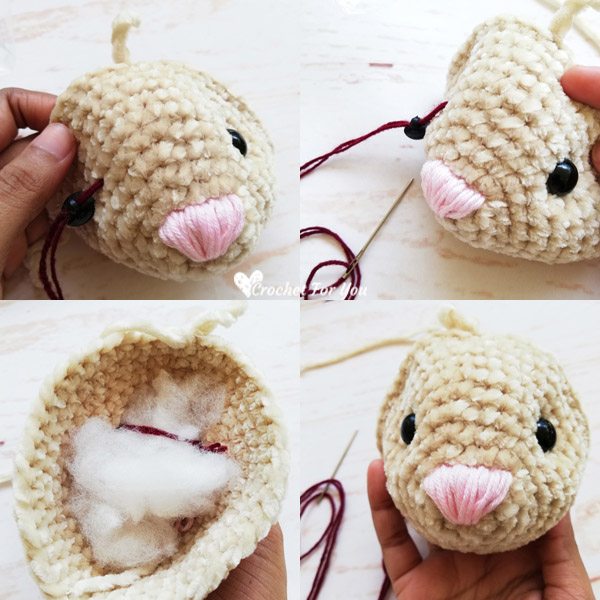
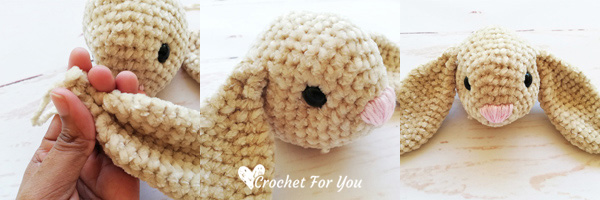
When attaching eyes to the head, I used shank buttons in black color that have a loop at the back. Because, instead of making round head, I need to get the real rabbit face.
So here what I did. Using a long piece of black color yarn and tapestry needle, I knot a tie on the loop of the first button, insert the needle from right side to the wrong side between 7 and 8 rounds where I want to attach the first eye. At this point, you can add fiberfill into the nose part. Then insert the needle from the wrong side to the right side between 7 and 8 rounds on other side of the front face where I want to attach next eye. (see image 2 below)

Insert the needle through the loop of the button and insert again through the same spot where you get the needle out (see images 1 & 2 below). Pull the yarn little bit tight to get the rabbit face detail. You can adjust the shape of the rabbit face while adjusting eyes and adding fiberfill. I added more fiberfill between eyes and nose to make forehead. When you get the shape of the forehead, tie a knot and add more fiberfill (see images 3 & 4 below).
Round 15: [sc dec, sc in each of next 5 sts] 6 times, sl st to the first st. (36 sts)
Round 16: [sc dec, sc in each of next 4 sts] 6 times. (30 sts)
Round 17: sc in each st around. (30 sts)
Round 18: [sc dec, sc in each of next 3 sts] 6 times. (24 sts)
Round 19: [sc dec, sc in each of next 2 sts] 6 times. (18 sts)
Round 20: [sc dec, sc in next st] 6 times. (12 sts)
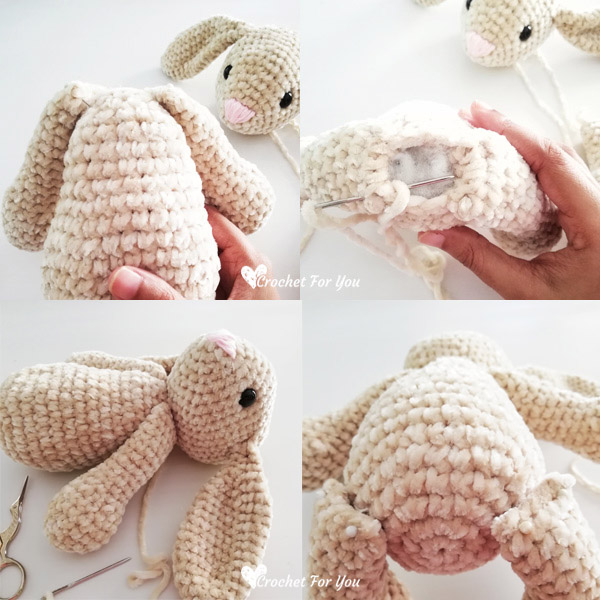
Round 21: start from the first st, sc dec around. (6 sts) Add fiberfill. Fasten off and cut the yarn leaving about 8″ long yarn tail. Close the head using a tapestry needle and yarn tail. (weave through the stitches around the last round and pull tightly to close, Tie a knot)
Ears (make 2)
With velvet yarn, make an adjustable/magic ring.
Round 1: 3 sc into the ring,
Round 2: sc inc around. (6 sts)
Round 3: sc inc around. (12 sts)
Round 4: sc in each st around. (12 sts)
Round 5: [sc inc, sc in next st] 6 times. (18 sts)
Round 6 to 14: sc in each st around. (18 sts)
Round 15: [sc dec, sc in next st] 6 times. (12 sts)
Round 16: sc in each st around. (12 sts)
Round 17: [sc dec, sc in next st] 4 times. (8 sts)
Round 18 to 20: sc in each st around. (8 sts) Fasten off and cut the yarn leaving about 8″ long yarn tail.
Fold the ear edge in half and sew between rounds 12 to 14. (see the photos below)
Body
Make an adjustable/magic ring.
Round 1: 6 sc into the ring. (6 sts)
Round 2: 2sc in each st. (12 sts)
Round 3: [sc inc, sc in next st] 6 times. (18 sts)
Round 4: [sc inc, sc in each of next 2 sts] 6 times. (24 sts)
Round 5: [sc inc, sc in each of next 3 sts] 6 times. (30 sts)
Round 6: [sc inc, sc in each of next 4 sts] 6 times. (36 sts)
Round 7: [sc inc, sc in each of next 5 sts] 6 times. (42 sts)
Round 8: sc in each st around. (42 sts)
Round 9: [sc dec, sc in each of next 5 sts] 6 times. (36 sts)
Round 10: sc in each st around. (36 sts)
Round 11: [sc dec, sc in each of next 4 sts] 6 times. (30 sts)
Round 12 to 13: sc in each st around. (30 sts)
Round 14: [sc dec, sc in each of next 3 sts] 6 times. (24 sts)
Round 15 to 16: sc in each st around. (24 sts)
Round 17: [sc dec, sc in each of next 2 sts] 6 times. (18 sts)
Round 18: sc in each st around. (18 sts)
Round 19: [sc dec, sc in next st] 6 times. (12 sts)
Round 20: sc in each st around. (12 sts) Fasten off and cut the yarn leaving about 12″ long yarn tail. Stuff firmly.
Arms (make 2)
Make an adjustable/magic ring.
Round 1: 6 sc into the ring. (6 sts)
Round 2: 2sc in each st. (12 sts)
Round 3: [sc inc, sc in next st] 6 times. (18 sts)
Round 4 to 6: sc in each st around. (18 sts)
Round 7: [sc dec, sc in next st] 6
Round 8 to 18: sc in each st around. (12 sts) Fasten off and cut the yarn leaving about 12″ long yarn tail. Stuff both arms firmly till 3/4. Sew the open with yarn tail.
Legs (make 2)
Make an adjustable/magic ring.
Round 1: 6 sc into the ring. (6 sts)
Round 2: 2sc in each st. (12 sts)
Round 3: [sc inc, sc in next st] 6 times. (18 sts)
Round 4: [sc inc, sc in each of next 2 sts] 6 times. (24 sts)
Round 5: [sc inc, sc in each of next 3 sts] 6 times. (30 sts)
Round 6 to 7: sc in each st around. (30 sts)
Round 8: [sc dec, sc in each of next 3 sts] 6
Round 9: sc in each st around. (24 sts)
Round 10: [sc dec, sc in each of next 2 sts] 6 times. (18 sts)
Round 11: sc in each st around. (18 sts)
Round 12: [sc dec, sc in next st] 6 times. (12 sts)
Round 13 to 19: sc in each st around. (12 sts) Fasten off and cut the yarn leaving about 12″ long yarn tail. Stuff both legs firmly till 3/4. Sew the open with yarn tail.

Tail
Make an adjustable/magic ring.
Round 1: 6 sc into the ring. (6 sts)
Round 2: 2sc in each st. (12 sts)
Round 3: [sc inc, sc in next st] 6 times. (18 sts)
Round 4 to 5: sc in each st around. (18 sts)
Round 6: [sc dec, sc in next st] 6 times. (12 sts)
Round 7: start from the first st, sc dec around. (6 sts) Stuff firmly.
Assembly
Don’t forget to pin each piece before sewing to the body part.
- With yarn tail, sew arms onto the last round of the body (see the photo above).
- Sew the head to the body top including arms.
- Sew the legs between rounds 4 and 7 on each side of the bottom of the body.
- Sew the bunny tail
Hope to see you soon with a new FREE pattern
Until then, Happy Crocheting!!
Share your finished projects of this pattern on Crochet For You FB page.
Happy hooking with Crochet For You!!
Let’s connect and share
Facebook | Pinterest | Twitter | Instagram
All contents include photography and patterns are copyrighted Crochet For You by Erangi Udeshika.
Do not copy, edit, distribute or republish patterns and images in this blog in part or whole as your own. Please, share a direct link to the pattern with others and anywhere else. You are welcome to make and sell finished items using my patterns.
Visit Copyright / Terms of use for more info.
Thank you.


Farmhouse Style Crochet Patterns


14 Comments
Tiffany Geier
Can you give me some tips for sewing the nose?
Erangi Udeshika
Hi Tiffany,
As you can see I Embroidered the nose while attaching eyes to the head. Using tapestry needle and the pink yarn, start from the first round where the adjustable ring located (middle of the first round). And make two angled lines (2 rows up) like a triangle. Then start to fill in the triangle with straight lines start from the same spot you started (middle of the first round).
Terry
Hi, could you explain how to do round 15 please as I am a bit confused. Thank you
Miri
Hi, what size are the shank buttons?
Erangi Udeshika
Shank button has a loop at the backside of the button.
Kathy
Thank you so much for sharing this adorable pattern!
Erangi Udeshika
Very welcome!
danielle
hi, is it okay if i sell the finished product using this pattern? i will of course credit you as the pattern maker
Erangi Udeshika
Hi Danielle, yes! you are welcome to make and sell finished items using my patterns. 🙂 https://www.crochetforyoublog.com/about/copyright-terms-of-use/
Lau
If I use a larger sized crochet hook (7 mm) will the bunny turn out larger too? I want to make it to about 15-20′
Erangi Udeshika
If you use a larger size hook the bunny will turn out larger but there might be gaps and holes between loose stitches and that will make difficult to stuffing and can be seen through the stitches. Also the pattern can stretch and lose the shape so you can hold 2 strands of yarn and change the hook size little bit up 6mm or 6.5mm. Before starting pattern make swatches with different sizes of hook and select the right size hook that make stitches thick and nice.
Jen
I want to make this for a baby so I don’t want to use the hard eyes. Do you have a recommendation about how to make baby safe eyes on this adorable bunny? Thanks!
Erangi Udeshika
You can sew eyes using black yarns and adjust the shape of the rabbit face between eyes by making two eyes without cutting yarn after done first eye. See the eye attaching part and images.
Linda C Sylvester
Sooooo cute! Thank you.