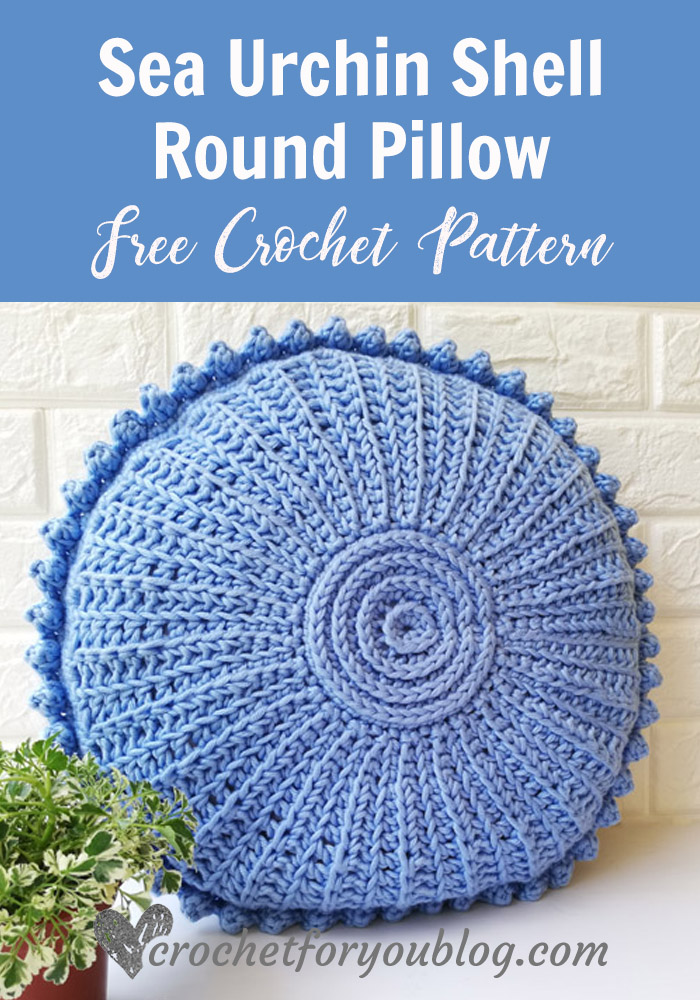
Sea Urchin Shell Crochet Pillow Free Pattern
Sea Urchin Shell Crochet Pillow Pattern by Crochet For You
Hi, my crochet lover friends! 😀 I’m super excited to bring you this lovely pillow pattern today.
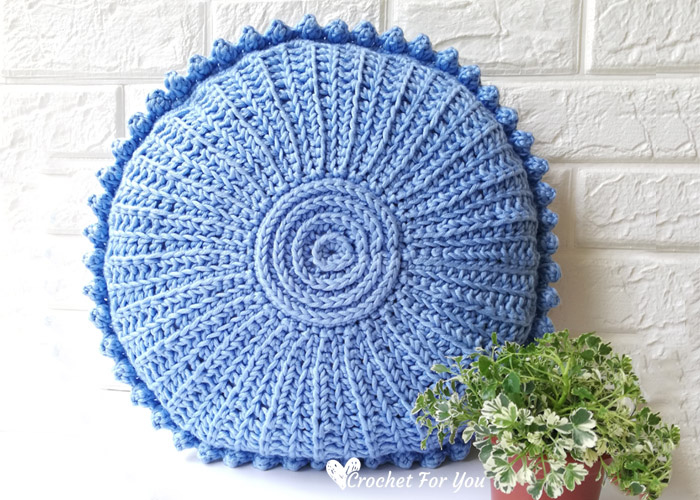
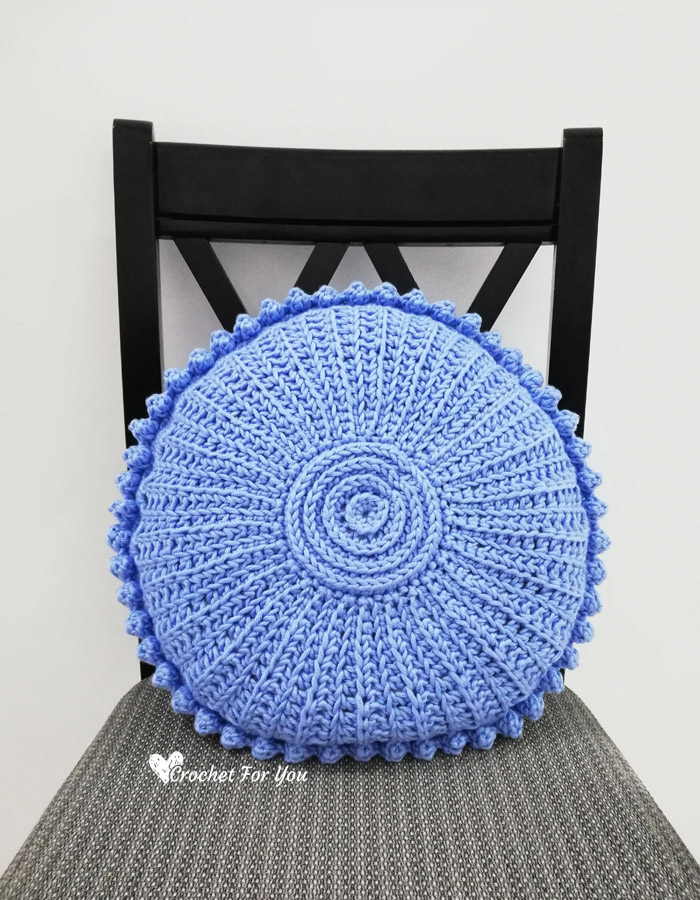
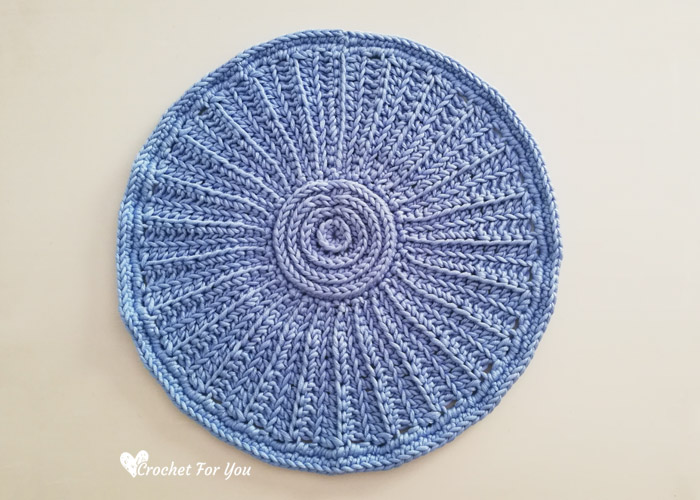
The Sea Urchin Shell Crochet Pillow looks so modern and has a nice texture, too.
I have added lots of step by step photos for this project to easily understand. The pattern is easier than you think. So I hope you will try to make your own pillow for your home.
Sea Urchin Shell Crochet Pillow made by joining 2 circles together. Each circle has 2 parts to crochet. Lastly, add a popcorn edge for a perfect finish. This pillow would great with any color of choice in #4-Medium / Worsted / Cotton yarns
I struggled so many days to find a perfect name for this crochet pillow pattern. 🙂 Many of you guys gave me lots of suggestions (thank you so much) but finally, I named it Sea Urchin Shell. Because of the sea urchin shell similar to this pillow pattern. 🙂
Disclosure This post contains affiliate links.
Add this pattern to Ravelry queue
Save on Pinterest
Skill level intermediate
Finished size: 16” diameter
Materials: #4-Medium / Worsted / Cotton / Approx: 400 yards
(I used)
- 2 skein of Soft Smooth Cotton Natural Double Knitting Wool Yarn Ball Baby Woolcraft 200g – Sky Blue
- I-9, 5.5mm crochet hook
- 16” round pillow form
- Tapestry needle for weaving ends.
- Stitch markers
- Scissors
- Fiberfill
Gauge: 13 sc x 14 rows = 4″ with I-9, 5.5mm crochet hook
Abbreviations/special stitches
- ch = chain
- sl st = slip stitch
- sc = single stitch
- hdc = half double crochet
- dc = double crochet
- st = stitch
- BL = Back Loop
- FL = Front Loop
- *to = repeat * to the instructions.
- (RS) = right side
- (WS) = wrong side
Special stitches
- 3-dc popcorn st = crochet 3 dc in indicated st, drop the loop from the hook, insert the hook from front to back under the top 2 loops of the first double crochet of 3 dc, grab the dropped loop with the hook and pull back through the stitch, ch 1 to close the stitch.
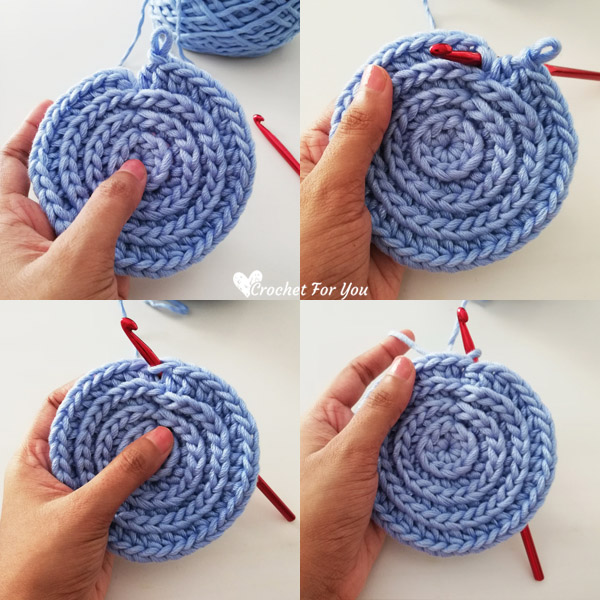
- hdc/sc in 3rd loop= instead of working crochet stitches in top loops of the previous round, you should find a 3rd loop on the wrong side or back side of the crochet piece. This 3rd loop is located on the wrong side just under the top 2 loops. Start to make a crochet stitch you want as normal way. When you inserting hook into the loop in the previous row just skipped the top 2 loops and turn a crochet piece forward and insert the hook in 3rd loop, Finish the stitch as normal.
- And I followed the invisible joining method on My Hobby Is Crochet. Because the normal method of joining is not matching when crocheting into the 3rd loop. It was really helpful and great for a nice texture with 3rd loop crochet. I have added step by step photos below. Click here to see “version II (with almost invisible joining)” a tutorial by My Hobby Is Crochet
Notes
- First, you need to crochet center of the circle.
- Then start to crochet next part around the center of the circle.
Sea Urchin Shell Pillow Pattern
Circle (make 2)
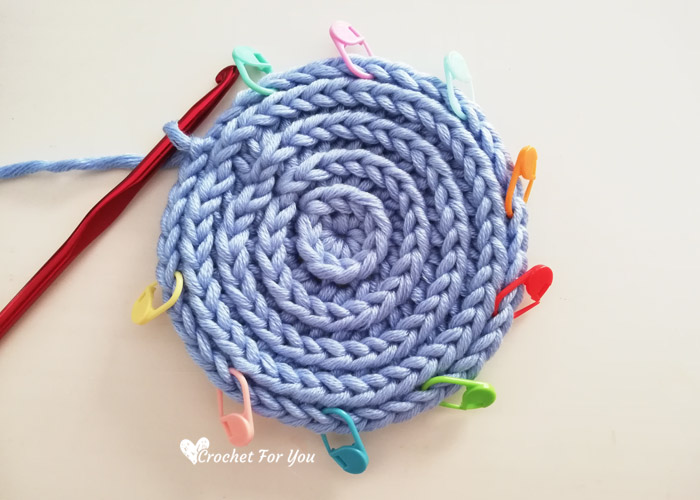
Center of the circle
Make a magic ring.
Round 1: ch 1, 10 hdc into the ring, sl st to the first st. (10 hdc)
Round 2: ch 1, 2 hdc into the 3rd loop of each st around, sl st to the first st. (20 hdc)
Round 3: ch 1, 2 hdc into the 3rd loop of first st, *1 hdc into the 3rd loop of next st, 2 hdc into the 3rd loop of next st; repeat * to around, sl st to the first hdc. (30 hdc)
Round 4: ch 1, 2 hdc into the 3rd loop of first st, *hdc into the 3rd loop of next 2 sts, 2 hdc into the 3rd loop of next st; repeat * to around, sl st to the first st. (40 hdc)
Round 5: ch 1, sc into the 3rd loop of each st around, sl st to the first st. (40 sc) (Add stitch markers on 4th, 8th, 12th, 16th, 20th, 24th, 28th, 32nd, 36th 40th stitches) do not cut the yarn, crochet ch 15 to start next part.
Crochet around the center of the circle (work in rows)
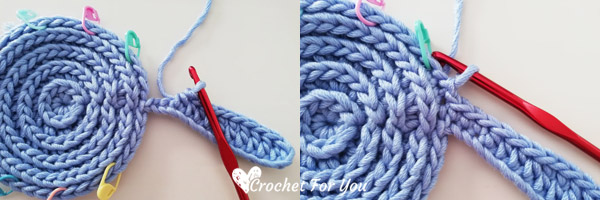
Row 1: (RS) dc in 3rd ch from the hook, dc in each of next ch 5, hdc in each of next ch 4, sc in each of next ch 3, sl st to the next sc of the center, sl st to the next sc of the center, ch 1, turn. (6 dc/4 hdc/3 sc)
Row 2: (WS) sc in FL of first st, sc in FL of each of next 2 sts, hdc in FL of each of next 4 sts, dc in FL of each of next 5 sts, dc in last st, turn. (6 dc/4 hdc/3 sc)
Row 3: (RS) ch 2, dc in first st, dc in BL of each of next 5 sts, hdc in BL of each of next 4 sts, sc in BL of each of next 3 sts, sl st to the next sc (marked st) of the center, ch 1, turn. (6 dc/4 hdc/3 sc)
Row 4: (WS) sc in FL of first st, sc in FL of each of next 2 sts, hdc in FL of each of next 4 sts, dc in FL of each of next 5 sts, dc in last st, turn. (6 dc/4 hdc/3 sc)
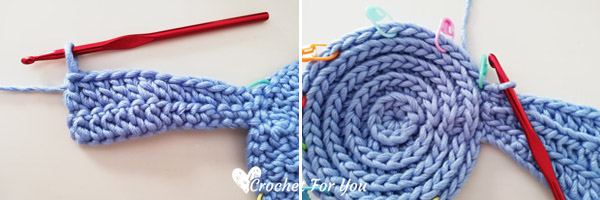
Row 5: (RS) ch 2, dc in first st, dc in BL of each of next 5 sts, hdc in BL of each of next 4 sts, sc in BL of each of next 3 sts, sl st to the next sc of the center, sl st to the next sc of the center, ch 1, turn. (6 dc/4 hdc/3 sc)
Row 6: (WS) sc in FL of first st, sc in FL of each of next 2 sts, hdc in FL of each of next 4 sts, dc in FL of each of next 5 sts, dc in last st, turn. (6 dc/4 hdc/3 sc)
Row 7: (RS) ch 2, dc in first st, dc in BL of each of next 5 sts, hdc in BL of each of next 4 sts, sc in BL of each of next 3 sts, sl st to the next sc of the center, sl st to the next sc (marked st) of the center, ch 1, turn. (6 dc/4 hdc/3 sc)
Row 8: (WS) sc in FL of first st, sc in FL of each of next 2 sts, hdc in FL of each of next 4 sts, dc in FL of each of next 5 sts, dc in last st, turn. (6 dc/4 hdc/3 sc)
Row 9: (RS) ch 2, dc in first st, dc in BL of each of next 5 sts, hdc in BL of each of next 4 sts, sc in BL of each of next 3 sts, sl st to the same sc (marked st) of the center, sl st to the next sc of the center, ch 1, turn. (6 dc/4 hdc/3 sc)
Row 10: (WS) sc in FL of first st, sc in FL of each of next 2 sts, hdc in FL of each of next 4 sts, dc in FL of each of next 5 sts, dc in last st, turn. (6 dc/4 hdc/3 sc)
Row 11: (RS) ch 2, dc in first st, dc in BL of each of next 5 sts, hdc in BL of each of next 4 sts, sc in BL of each of next 3 sts, sl st to the next sc of the center, sl st to the next sc of the center, ch 1, turn. (6 dc/4 hdc/3 sc)
Row 12: (WS) sc in FL of first st, sc in FL of each of next 2 sts, hdc in FL of each of next 4 sts, dc in FL of each of next 5 sts, dc in last st, turn. (6 dc/4 hdc/3 sc)
Row 13: (RS) ch 2, dc in first st, dc in BL of each of next 5 sts, hdc in BL of each of next 4 sts, sc in BL of each of next 3 sts, sl st to the next sc (marked st) of the center, ch 1, turn. (6 dc/4 hdc/3 sc)
Row 14: (WS) sc in FL of first st, sc in FL of each of next 2 sts, hdc in FL of each of next 4 sts, dc in FL of each of next 5 sts, dc in last st, turn. (6 dc/4 hdc/3 sc)
Row 15 to 50: repeat rows 5 to 14 continuously until 50 rows total. As the last row, you have to follow row 10.
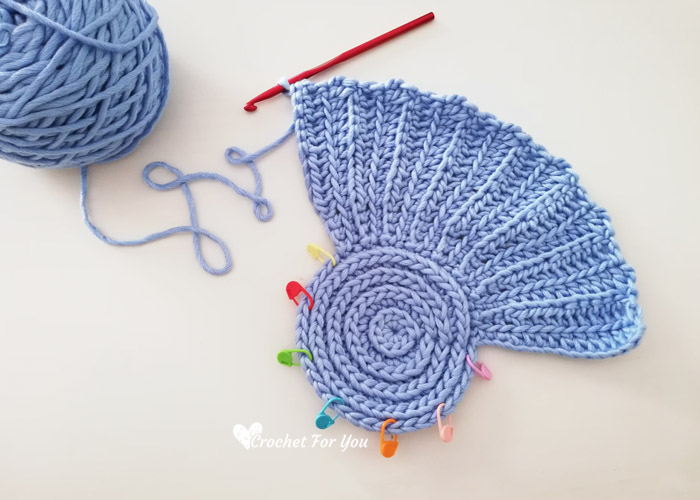
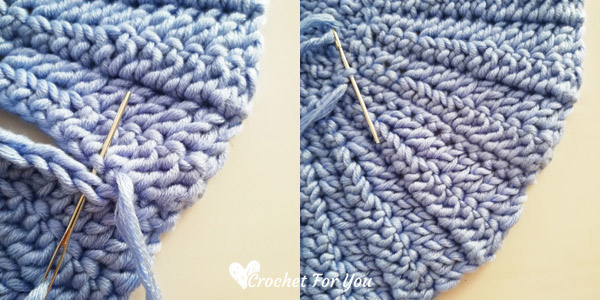
Fasten off and cut the yarn leaving about 10” long yarn tail. Join the opening using yarn tail on the wrong side.
Edging:
Round 1: join the yarn with ch 1 (RS), crochet sc in around evenly. I crocheted 149 sc sts around. Fasten off and weave the ends.
Round 2: ch 1, sc in each st around, sl st to the first st.
Joining 2 circles together with single crochet
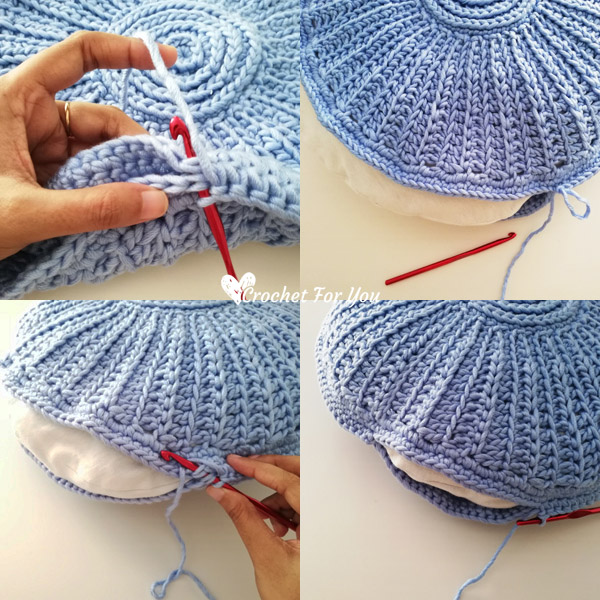
hold 2 pieces together facing the wrong side (WS) each other, insert the hook into first st in both pieces, ch 1, sc in same st, sc in each st around the curved edge until last st. When you are about halfway around insert the pillow inside and continue joining around the pillow until last st. sl st to the first st. Do not cut the yarn. (150 sts total around the curved edge.)
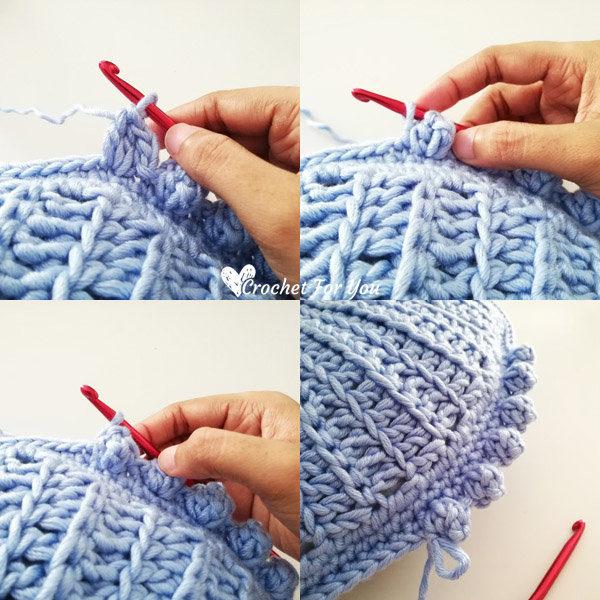
Popcorn edging
*ch 1, 3-dc popcorn st in next st, ch 1, sl st to the next 2 sts; repeat * to around, sl st to the first st.
Hope to see you soon with a new FREE pattern
Until then, Happy Crocheting!!
Share your finished projects of this pattern on Crochet For You FB page.
Happy hooking with Crochet For You!!
Let’s connect and share
Facebook | Pinterest | Twitter | Instagram
All contents include photography and patterns are copyrighted Crochet For You by Erangi Udeshika.
Do not copy, edit, distribute or republish patterns and images in this blog in part or whole as your own. Please, share a direct link to the pattern with others and anywhere else. You are welcome to make and sell finished items using my patterns.
Visit Copyright / Terms of use for more info. Thank you.