Crochet Lil Velvet Pumpkin Free Pattern
Crochet Lil Velvet Pumpkin Pattern by Crochet For You.
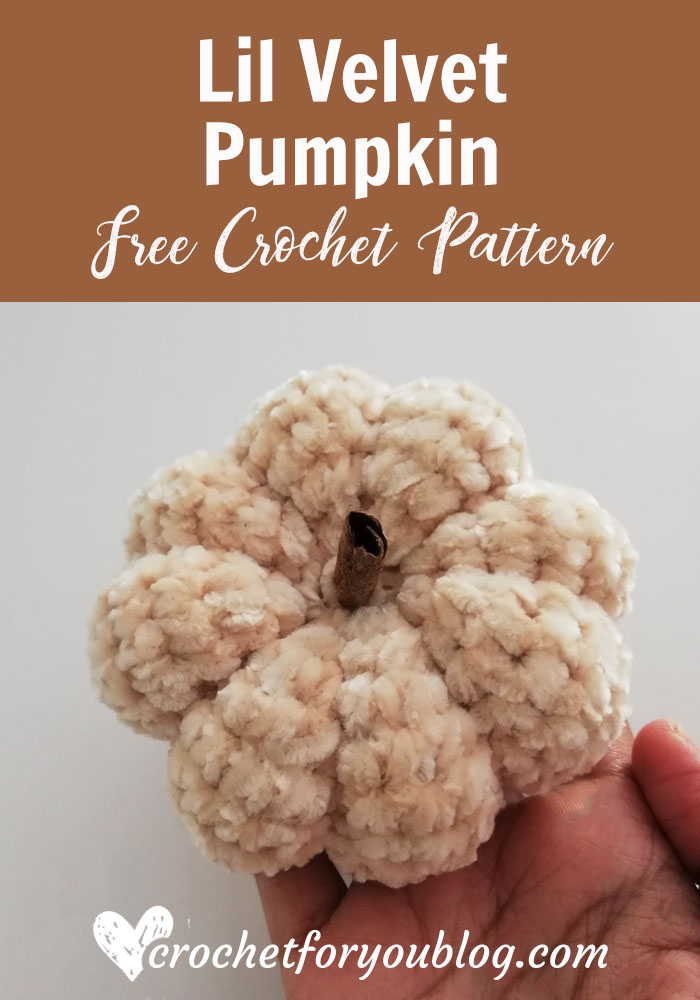
For the first time, I whipped up a little pumpkin with some leftover velvet yarns after making Sandy Bobble Velvet Throw Pillow. I was inspired by all cute crochet/knit pumpkins out there. This Lil Velvet Pumpkin is quick and easy to crochet. If you have lately worked with velvet yarns like me, You may definitely have some yarns to try this pattern. I hope you enjoy! 🙂
Disclosure This blog may contain affiliate links.

Add this pattern to Ravelry queue
Save on Pinterest
Skill level intermediate
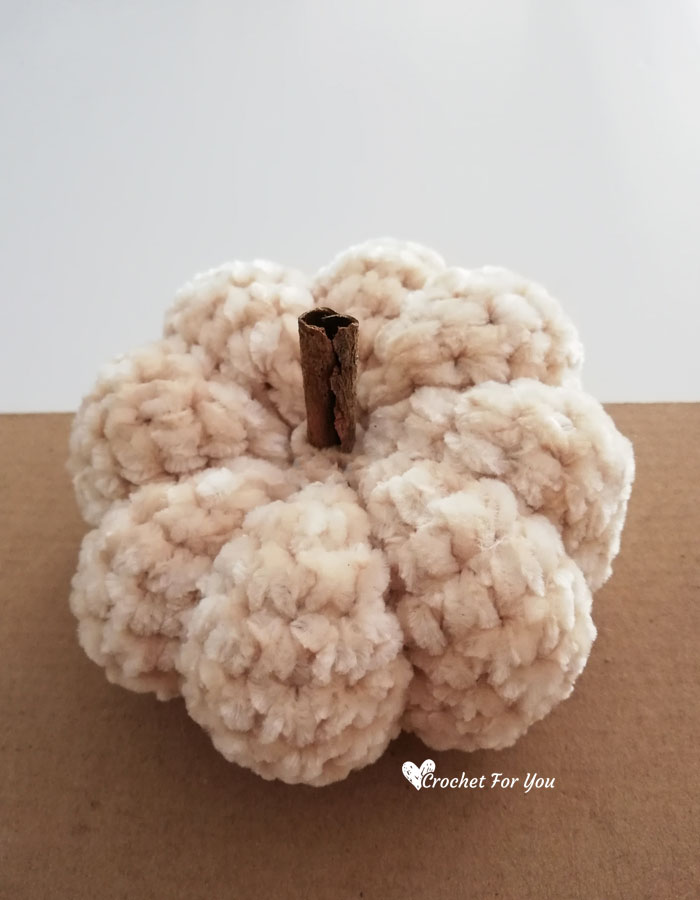
Finished size: 3.5″ diameter, 2″ tall
Materials: #4-Medium / Worsted / Velvet / Approx: 50 yards
(I used)
- Velvet yarn (approx: 30 yards).
- H-8, 5mm crochet hook
- fiberfill
- yarn needle for weaving ends.
- Scissors
- Cinnamon stick
Gauge: the gauge is not very important for this project.
Abbreviations/special stitches
- ch = chain
- sl st = slip stitch
- sc = single stitch
- st = stitch
- sk = skip
- *to = repeat * to the instructions.
- sc2tog = Insert hook next st and draw up a loop. Insert hook in next st and draw up a loop. Yarn over, pull back through all 3 loops on hook at once.
Lil Velvet Pumpkin Pattern
Make a magic/adjustable ring.
Round 1: ch 1, 8sc into the ring, sl st to the first st. (8 sts)
Round 2: ch 1, 2sc in each st around, sl st to the first st. (16 sts)
Round 3: ch 1, sc in first st, *2sc in next st, sc in next st; repeat *to around, sl st to the first st. (24 sts)
Round 4: ch 1, sc in first st, *2sc in next st, sc in each of next 2 sts; repeat *to around, sl st to the first st. (32 sts)
Round 5: ch 1, sc in first st, *2sc in next st, sc in each of next 3 sts; repeat *to around, sl st to the first st. (40 sts)
Round 6: ch 1, sc in each st around, sl st to the first st. (40 sts)
Round 7 to 10: repeat round 6.
Round 11: ch 1, sc in first st and next 2 sts, *sc2tog, sc in each of next 3 st; repeat *to around, sl st to the first st. (32 sts)
Round 12: ch 1, sc in first st and next st, *sc2tog, sc in each of next 2 st; repeat *to around, sl st to the first st. (24 sts) start adding fiberfill.
Round 13: ch 1, sc in first st, *sc2tog, sc in next st; repeat * to around, sl st to the first st. (16 sts)
Round 14: ch 1, start from the first st, sc2tog around. Fasten off and cut the yarn leaving 20 – 30″ long yarn tail.
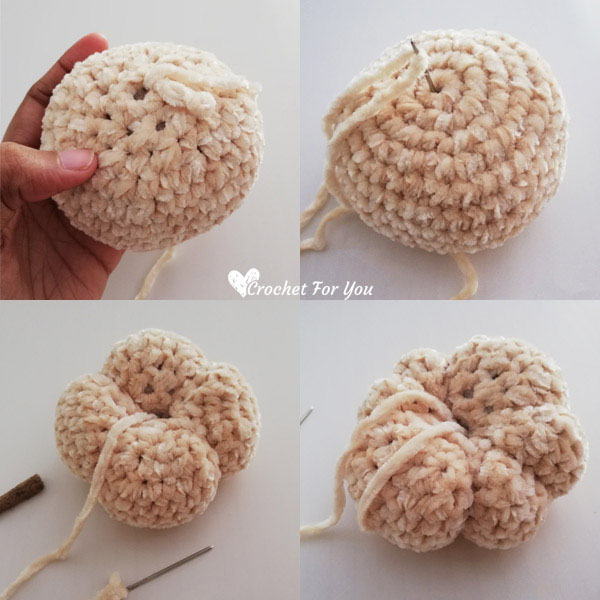
Adding ridge
Insert the yarn tail through the yarn needle, and wrap the yarn half around the pumpkin and in through bottom hole to the top hole. Pull the yarn tightly to make a ridge. And again and again, do this few times. (I made 8 ridges). Finally, add a Cinnamon stick into the hole and you are done!
Hope to see you soon with a new FREE pattern
Until then, Happy Crocheting!!
Share your finished projects of this pattern on Crochet For You FB page.
Happy hooking with Crochet For You!!
Let’s connect and share
Facebook | Pinterest | Twitter | Instagram
All contents include photography and patterns are copyrighted Crochet For You by Erangi Udeshika.
Do not copy, edit, distribute or republish patterns and images in this blog in part or whole as your own. Please, share a direct link to the pattern with others and anywhere else. You are welcome to make and sell finished items using my patterns.
Visit Copyright / Terms of use for more info. Thank you.