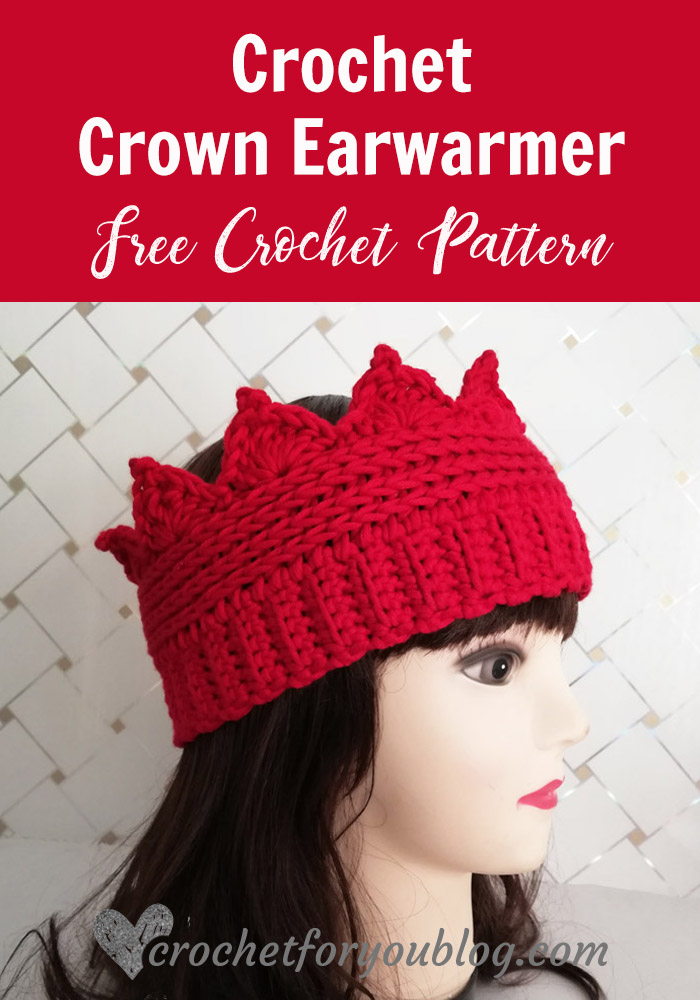
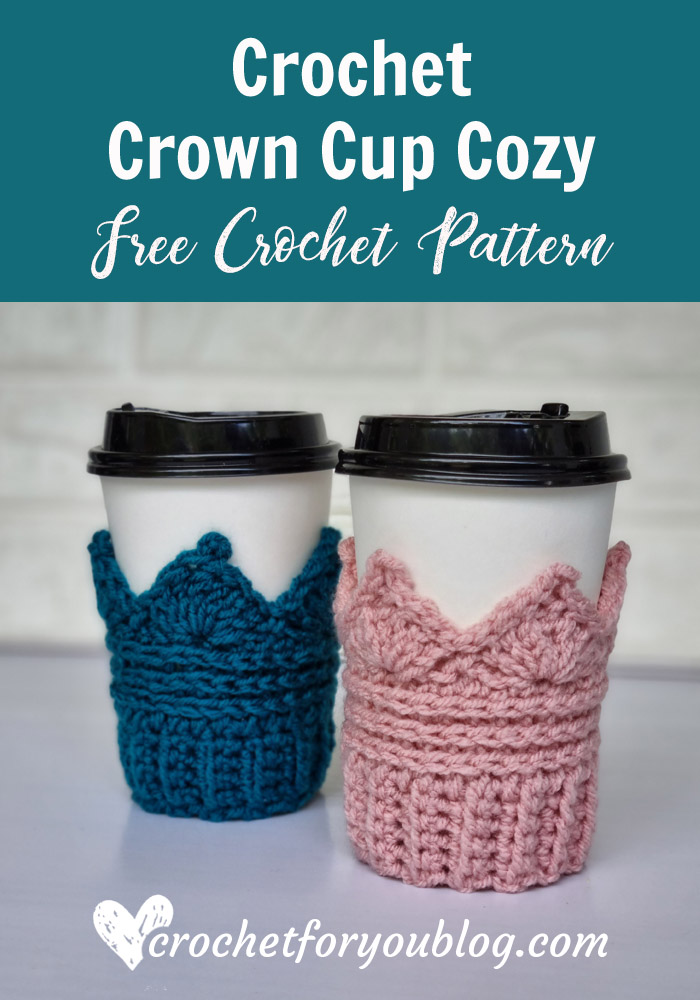
Crochet Crown Ear warmer Free Pattern
Crochet Crown Ear warmer Pattern by Crochet For You.
Make your own Crown Ear warmer not just for fun but keep your ears warm in the cool weather. This pattern can be easily adjusted to any size. It means you can use any yarn weight and the gauge is not very important.
Isn’t this Crochet Crown Ear warmer perfect for kids? They can play king and queen roles while they are wearing it on winter days. Kids will love to wear it all day. And I hope you like this pattern as a gift idea too… There are so many possibilities. This crown Ear warmer is perfect for Christmas, birthday parties, and as a prop. 😀 What do you think? I like to hear your thoughts.
Disclosure This blog contain affiliate links.

Add this pattern to Ravelry queue
Save on Pinterest
Watch the Video Tutorial Below
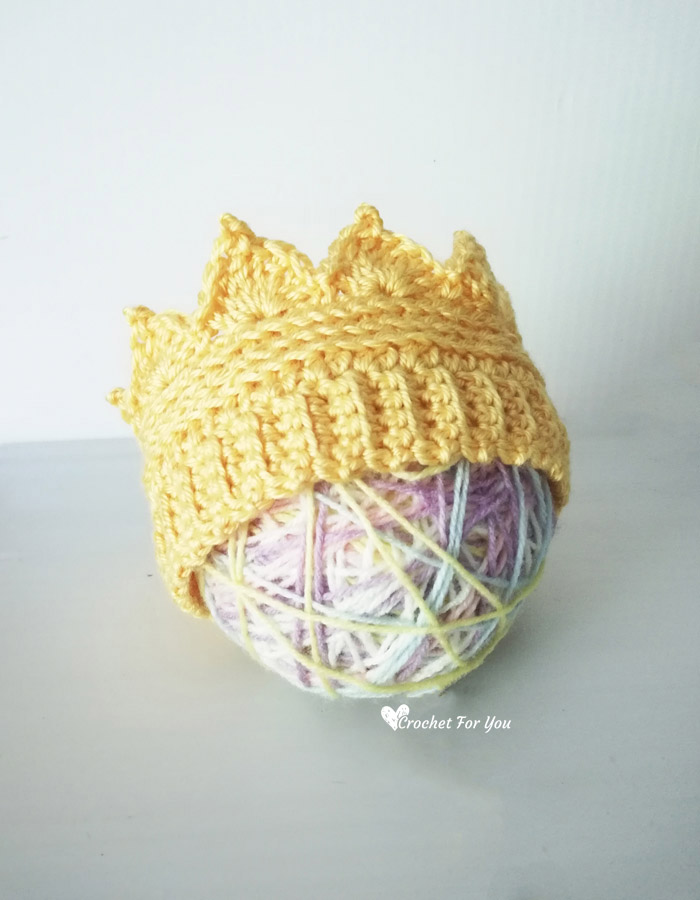
Guide for Baby Sizes
This post contains more instructions/tips for how to crochet this ear warmer in any size.
Crochet Crown Ear Warmer Pattern for Newborn to Toddler Size
More Crochet Patterns with Crowns
Skill Level: Intermediate
Finished sizes: (This pattern can be adjusted to any size)
- Teen/Adult: 20” circumference and 5” height
- Child: 17.5” circumference and 4.5” height
Materials:
#4 – Medium / Worsted weight yarns (Approx: 100 total yards) for each
(I used)
- #4 – Medium / Worsted weight yarns Approx: 100 yards
- US I-9, 5.5mm crochet hook
- Tapestry needle for weaving ends.
Gauge: 13 sc x 14 rows = 4″ with I-9, 5.5mm crochet hook.
Abbreviations (US Term)
- sl st = slip stitch
- ch = chain
- sc = single crochet
- hdc = half double crochet
- dc = double crochet
- tr = treble crochet
- sk = skip
- * to ; = repeat * to the instructions.
- beg = beginning
- (RS) = right side
Special stitches
- hdc/sc in 3rd loop= instead of working crochet stitches in top loops of the previous round, you should find a 3rd loop on the wrong side or back side of the crochet piece. This 3rd loop is located on the wrong side just under the top 2 loops. Start to make a crochet stitch you want as normal way. When you inserting hook into the loop in the previous row just skipped the top 2 loops and turn a crochet piece forward and insert the hook in 3rd loop, Finish the stitch as normal. 🙂
- Picot = crochet ch 3, sl st to the previous tr you just crocheted.
- Shell stitch = (2 dc, 2 tr, picot, 2 tr, 2 dc) in indicated st.
Notes:
- This ear warmer has a ribbed band and can be adjusted to any size. Crochet multiple of 6 rows for the ribbed band part to get your desired circumference. (work in rows and join 2 short sides together to make a ribbed band).
- If you can’t get the actual measurements of the person, you can follow the Hat sizing guide chart. Select the age group you want and try to get the closest number of the hat circumference by crocheting multiple of 6 rows for the band.
- Beg ch does not count as st.
Crochet Crown Earwarmer Pattern
Teen/Adult: 20” circumference and 5” height

Ribbed Band
66 rows for the ribbed band = 20” (teen/adult size)
Leaving 6” long tail of the yarn, with the 5.5mm crochet hook.
ch 7
Row 1: sc in 2nd ch from the hook, sc in each st across, turn. (6 sts)
Row 2: ch 1, sc in first st, sc in BL of each of next 4 sts, sc in last st, turn. (6 sts)
Row 3 to 66: repeat row 2.
Insert the yarn tail through the tapestry needle, place two short sides together and sew with the tapestry needle.
(Work in the long side of the band)
Round 1: (RS) ch 1, hdc in first st and each st around, sl st to the first hdc. (66 sts)
Round 2: ch 1, hdc into the 3rd loop of each st around, sl st to the first hdc. (66 sts)
Round 3 – 4: repeat round 2.
Round 5: ch 1, sc into the 3rd loop of each st around, sl st to the first sc. (66 sts)
Round 6: ch 1, sc in first st, * sk next 2 sts, shell st (see the special stitches above) in next st, sk next 2 sts, sc in next st; repeat to around, sl st to the first sc. (11 shells)
Child: 17.5” circumference and 4.5” height

Ribbed Band
54 rows for the ribbed band = 17.5” (child size)
Leaving 6” long tail of the yarn, with the 5.5mm crochet hook.
ch 6
Row 1: sc in 2nd ch from the hook, sc in each st across, turn. (5 sts)
Row 2: ch 1, sc in first st, sc in BL of each of next 3 sts, sc in last st, turn. (5 sts)
Row 3 to 54: repeat row 2.
Insert the yarn tail through the tapestry needle, place two short sides together and sew with the tapestry needle.
(Work in the long side of the band)
Round 1: (RS) ch 1, hdc in first st and each st around, sl st to the first hdc. (54 sts)
Round 2: ch 1, hdc into the 3rd loop of each st around, sl st to the first hdc. (54 sts)
Round 3: repeat round 2.
Round 4: ch 1, sc into the 3rd loop of each st around, sl st to the first sc. (54 sts)
Round 5: ch 1, sc in first st, * sk next 2 sts, shell st (see the special stitches above) in next st, sk next 2 sts, sc in next st; repeat to around, sl st to the first sc. (9 shells)
Video Tutorial
To make this Crown Ear Warmer in adult size I used Red Heart Super Saver – Dusty Gray (Amazon Affiliate)


Hope to see you soon with a new FREE pattern
Until then, Happy Crocheting!!
Share your finished projects of this pattern on Crochet For You FB page.
Happy hooking with Crochet For You!!
Let’s connect and share
Facebook | Pinterest | Youtube | Instagram
All contents include photography and patterns are copyrighted Crochet For You by Erangi Udeshika.
Do not copy, edit, distribute or republish patterns and images in this blog in part or whole as your own. Please, share a direct link to the pattern with others and anywhere else. You are welcome to make and sell finished items using my patterns.
Visit Copyright / Terms of use for more info.
Thank you.

89 Comments
Marilyn Delgado
Teen/adult size says chain 7 then single crochet, startimg on second chain make 6 SD = 6 stitches. Then 1 sc in first sc of previous row 1 sc in back loop of next 3 stitches then 1 sc in next stitch which equals 5 stitches not 6…
Why is this? It says supposed to be 6 stitches count throughout the rounds. Am I missing something?
Erangi Udeshika
Hi Marilyn, It was a typo. I fixed and updated. Thank you so much for letting me know about it. 🙂
Vanessa
Hi….I have been asked to make one of these for an infant….7 to 8 months old….how would I adjust the band length? Do I go down 12 rows like you did with the adult to child size? Thanks!
Carole Melton
Adorable
Rosemarie Vigil
Thank you so much for sharing your pattern
For free. I was wondering to buy your pattern to be able to print let me know. I like to have the pattern. Thank you for your time,
Rosemarie Vigil
Jennifer
Beautiful! Would you mind telling me what yarn you used for the red one?
Erangi Udeshika
I purchased the red yarn from eBay.
Pamela
Thank you for sharing your “adorable” Crochet pattern. Everyone needs a crown or two especially in the Winter.
Peggy
I do not know how to crochet, but would like to have one mad for me to purchase. Would this be something someone could do for me? Thanks!
Alex
Hello, I’ve made this beautiful crown for several friends and family members, but there’s one person who I’ve struggled to make anything for, because of their large head.
Do I increase the chains for this, or do I just go up a hook or two?
Please advise.
Tera Otto
If you increase your ribbed band by six rows, this will give you room to put in one more pointy shell. Hope that helps.
Ellen Hutton
I need help on this. Please explain to me what ‘hdc into the 3rd loop of each st around’ means. The 3rd loop is what is confusing me. Thank you.
Erangi Udeshika
Hi Ellen, you can find the instructions for how to crochet in 3rd loop in the special stitches in this pattern post. Or you can google search 3rd loop crochet.
Heather Alford
Okay so I’m at the last step with the shell st around the top but I cant for the life of me figure out how you only did 11 of them! I have counted and recounted my stitches and I only have 66 st like it says. But for some reason I can do 16 shell sts. They are supposed to go all around right? And for the shell stich all 2 dc, 2 tr, picot, 2 tr, 2 dc for it go into one single st correct?
Erangi Udeshika
Did you skip 2 sts after crocheting shell and sc in repeat section in the last round? Surely you have missed to skipped 2 sts in some whare in the last round.
Lindasue
Thank you for the pattern. I’m always looking for new things to do.
Monica
Was wondering where to do the picot Stitch… Did I miss it in the instructions somewhere?
Erangi Udeshika
First, you need to follow instructions for shell stitch. After you crochet 2tr in shell st, follow instructions for picots in special stitches. For the picot you need to crochet ch 3, and sl st to the previous tr you just crocheted in shell st.
Shari
I got head sizes for my friend’s 1 year old…18.5″
For my grandson (3)…19.5″
For another friend’s granddaughter, 3 yesterday, 19.5″.
For them all, I must use 80 or more sts. Using Simply Soft and an H hook. For the last row (shells), I use a G hook..much more ‘finished’ looking. I don’t know where you got the sizes and st counts.
Great pattern, though!
Julia
Do you have a youtube video on this?
Erangi Udeshika
Sorry, I have no video tutorial for this pattern.
Melanie Muske-Fleener
Excellent job! I absolutely love how mine turned out! 🙂 however, my toddler stole it so I better make her one too!!
Erangi Udeshika
Hi Melanie, glad you like the pattern. 😀
Lisa
So on the last row where you make the crowns, does that go in the normal stitch or are you still working the on the 3rd loop?
Erangi Udeshika
The last round works normal way (works through 2 loops of the stitches in the previous round).
Marlene
Row 2: ch 1, sc in first st, sc in BL of each of next 3 sts, sc in last st, turn. (5 sts). BL= Back loop? Just checking!
Erangi Udeshika
Yes, BL means back loop. 🙂
Ingerid jakobine Kjær
Hi! I am from norway, and dont understand what “sts” means, i tryd google, but got no answer! Thanks alot!
Erangi Udeshika
Hi Ingerid, sts means stitches. 🙂
Tanya
What kind of yarn did you use?
Erangi Udeshika
I used 4-medium, worsted weight yarn that I purchased on eBay.
Lilith
Is there a video to follow this whole pattern?
Erangi Udeshika
No, but I hope to create a video for this pattern in the future. 🙂
Sheila
I was wondering could you make a video or do you have a video on how to make a the crochet crown ear warmer for the ones that don’t know how to read them.
Erangi Udeshika
I hope to create a video tutorial in the future.
Sherry
I was wondering, in order to make this for a 4 year old & 6 year old is the smaller size small enough?
Thank you for the pattern?
Erangi Udeshika
You can change crochet hook to a smaller size or change the yarn weight like (light worsted or DK) and follow the child size pattern to make a smaller size ear warmer.
Tanya
What kind of yarn did you use? I know you said you got it off of Ebay but what was the brand?
Erangi Udeshika
Ohh. I purchased this yarn it years ago and had no brand name or label on it. 🙁
Lisa stedner
Thank you so much fun pattern my nieces are all putting there orders in for there daughters and themselves ?
Erangi Udeshika
Glad to hear that you all like the pattern. Thank you so much you, too. 🙂
Eileen
I am working on the crown ear warmer. Is the 20″ band measured before it is stretched or is it supposed to stretch to 20″. I have finished all 66 rows but without stretching it measures 18″.
Thank you so much! Thank you for the pattern!
Erangi Udeshika
I hope it will get the 20″ if you change the crochet hook to a larger size.
Luna
So the instructions end after row 6. No where is there instructions of picots or tr. I have found this frustrating .
Erangi Udeshika
Hi Luna if you look at carefully in Special stitches part on the pattern you can find how to crochet picot and also shell st. Because the tr is the basic stitch I didn’t put the full instruction. If you google search For tr (treble crochet) stitch, you can find lots of written and video tutorials about how to crochet treble stitch. 🙂
Rebekah martin
How do you decrease the pattern for a smaller head
Erangi Udeshika
As I told in the pattern, the simple method is to adjust this pattern to any size is crocheting multiple of 6 rows for the band until getting your desired circumference.
Karen Richert
Hello, would the child size crown fit a 1 year old…..How old do you think the child size would fit…and if the crown had to be made a bit smaller for a 1 year old how many rows of the brim would you need to do..Thank you so much….Love this pattern 🙂
Erangi Udeshika
Hi Katen, you can crochet 48 rows for toddler size. Because the 48 is the next lowest number of multiple 6. Also, you can change crochet hook to a smaller size or change the yarn weight like (light worsted or DK) And follow the child size pattern to make a smaller size ear warmer.
Shari
I got head sizes for my friend’s 1 year old…18.5″
For my grandson (3)…19.5″
For another friend’s granddaughter, 3 yesterday, 19.5″.
For them all, I must use 80 or more sts. Using Simply Soft and an H hook. For the last row (shells), I use a G hook..much more ‘finished’ looking. I don’t know where you got the sizes and st counts.
Great pattern, though!
Krista
Hi, about how long does one of these take you to make? Thanks. And have you ever made one out of cotton?
Erangi Udeshika
Hi Krista, I think I spent less an hour to make adult size. I didn’t crochet 100% cotton yarn but if you made out of cotton I hope it will add more stiffness to the ear warmer. 🙂
Vanessa
I’ve made 3 child size today! These are adorable and work up so fast! Thank you so much for the free pattern!
Erangi Udeshika
Very welcome! Glad you like the pattern 🙂
Kay
I don’t understand how and where the ribbed band is connected to the long part. Is there anywhere that shows pics of each step?
Erangi Udeshika
No need to fasten off or cut the yarn. To sew short sides together you can use the yarn tail about 6″ long we left when starting the pattern. And after sewing, you have a band like a large ring or loop. Now you can insert the hook again the loop we were working, crochet ch 1, work hdc in each st around the long side of the band (around one edge of the ribbed bang) as written in round 1. I hope thi will help. 🙂
Kay
Yes, thank you. I thought the ribbed pat was supposed to be created as part of the long (chain 54) part. Now I know I have to hdc them together.
Shauna R Wing
Everyone loved your pattern! Thanks for sharing it!
Erangi Udeshika
I’m so happy about it. Thank you, too. 😀
Angel
Thank you so much for this pattern! Love it. Do you know if using spray starch with help the points stand up more?
Rose e crigger
Thanks found your pattern easy and very delightful to work on works up very quickly thanks again great work
Tracy
On round 2, I keep ending up with 67/68 stitches when I slip stitch to start the next round. After I chain 1 do I follow into the same stitch or start in the next stitch? Appreciate the help
Erangi Udeshika
Yes, because the beg ch does not count as st (look at the note section) you need to start next round from first st in the previous round. 🙂
Cindy Higgins
Love this pattern! Thanks for sharing
Linda
Absolutely LOVED your pattern….made two up for my granddaughters while watching a Christmas movie! Take no time at all. Your instructions are perfect; super easy to follow along with!! Very well written!!
Erangi Udeshika
Thank you so much Linda 🙂
Cara
Love this. Is it written in US standard crochet terms?
Erangi Udeshika
Yes! 🙂
Linda Ledford
Very cute pattern and very easy to make. Thank you.
Erangi Udeshika
Thank you, too.
Carmen Vera
I so Love this pattern. Thank you
Erangi Udeshika
You’re welcome! 🙂
Janet
What process do I need to use to make the points stand up?
Erangi Udeshika
If you need more stiffness you can use starch only on the points.
Janet
Love the pattern! I’ve never done the hdc/sc in 3rd loop. My points are not standing up straight. What do you suggest I do?
Erangi Udeshika
You can use starch only on the points.
Kyla
LOVE! LOVE! LOVE! Thanks so much for sharing.
Erangi Udeshika
You are welcome! 🙂
Claudine C Osborne
Love this pattern! I have made 5 since Jan 1 and 3 granddaughters claimed them already! Fun quick to do and are so adorable. Grandson wants one too hes 2! I have only used one skein of yarn too. lol
Erangi Udeshika
Thank you so much! I’m so glad you like the Crown pattern. 😀
melissa
Hi! I have been trying to make this for my daughters in the child size. I made the band at 54rows and it is way too small. I am using #4 yarn. Idk what i am doing wrong. Any advice???
Erangi Udeshika
Hi Melissa, it could happen due to our crocheting style, and different type of yarns we used. Do you think it will get the right measurement if you change the crochet hook to a larger size? Or with the same hook size you used, you can crochet multiple of 6 rows for the band until you get the desired circumference. 🙂
Hint: add more 6 rows to the band if you still can’t get it you can add more 6 rows.
María Fríða
Thank you so much for this pattern, I am making it for friends daughter and she loves it, so now I am making it for all her friends, and all the small kids I can find 😛 it is wonderfull to make, fun and easy. I have had to adjust the counts for size becaus I use finer yarn and needle, but I do so love it. wonderfull thank you so much ^^
Loxie
Hello, I watched your video tutorial for the crown earwarmer – I have a question about the last part of the video – after stitching around the points, to help them stand up, the video showed more stitching in the opposite direction – is that correct? I wasn’t able to follow what/why that was being done. Please clarify for me – the crown I made turned out SO cute and I just want to make sure I’m following all of the directions.
Erangi Udeshika
Oh loxie, there is no more round in opposite direction. it was a mistake I made when editing video. I’m left-handed so when making this video for right-handed I had to flip the video. The opposite side you see is the one I couldn’t flip and I haven’t noticed it until now. Sorry for that. 🙂
Kathy Manning
Thank you so much for this pattern. I wouldn’t have dared try it until I saw the video. I bought a stocking cap, but, ended up giving it away as it made my hair so full of static electricity. Wore earmuffs but they’re either too big or small. This is just what I need. I hope I can find this again after buying yarn and a hook.
Destiny
I love this pattern. Just found it and thought I would find a lot of trouble with the 3rd st. Whoa, it was sooo easy. Your instructions made this such an easy pattern that I can tell, I will be making a few. Thank you for allowing this to be free.
Oswin
Love this idea but does anyone know how you could make it on a round loom knitter? That is the only way I know how to knit.
Dina
Just made one for my niece! Used Rose (color)Red Heart With Love in Metallic. Super cute! The points didn’t stand up enough, so I switched to a smaller hook and it came out perfectly ! Thank you for the pattern!