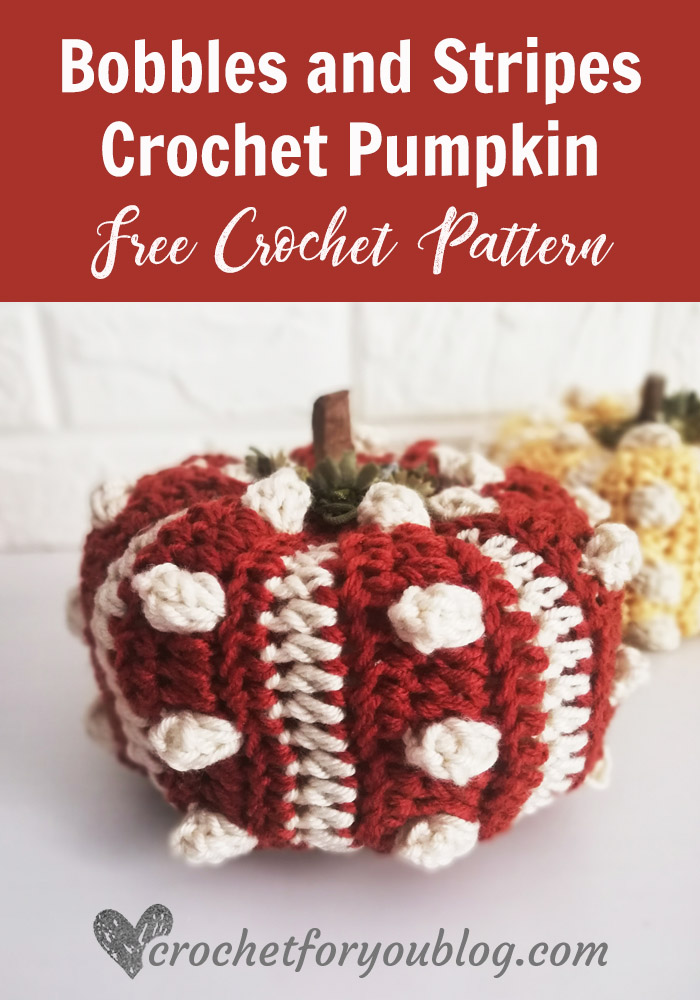
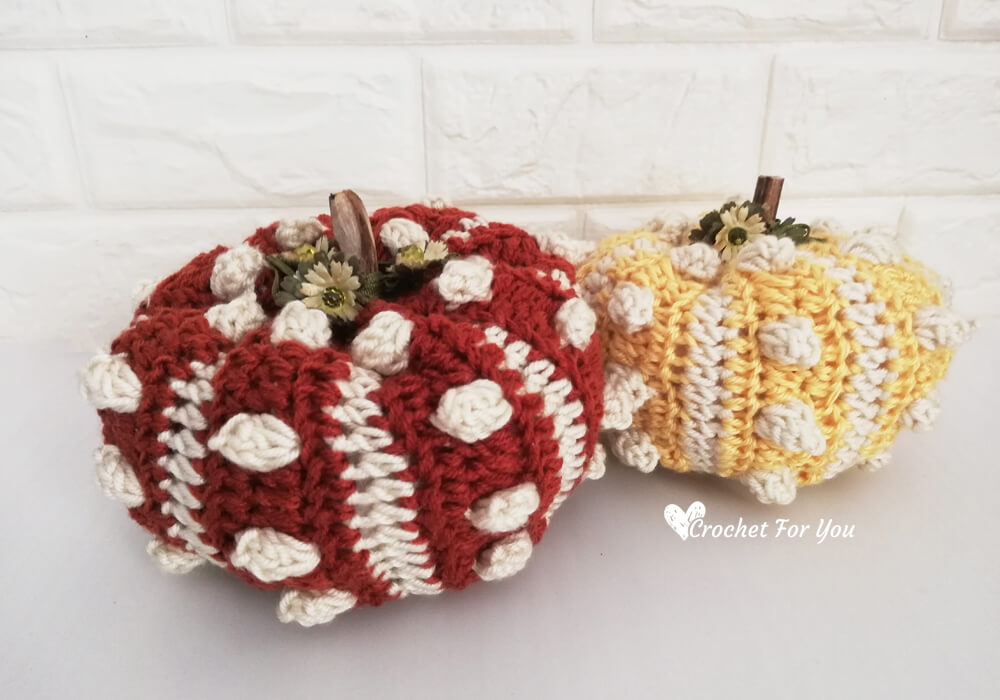
Crochet Bobbles & Stripes Pumpkin Free Pattern
Crochet Bobbles & Stripes Pumpkin Pattern by Crochet For You
Learn how to crochet bobbles and stripes pumpkins to decorate your home for fall. If you are a crochet bobbles lover like me, you will love this fun Bobble texture in contrasting colors and the stripes add a more complicated look but it is easier to crochet than you think.
Add this pattern to Ravelry queue
Save on Pinterest
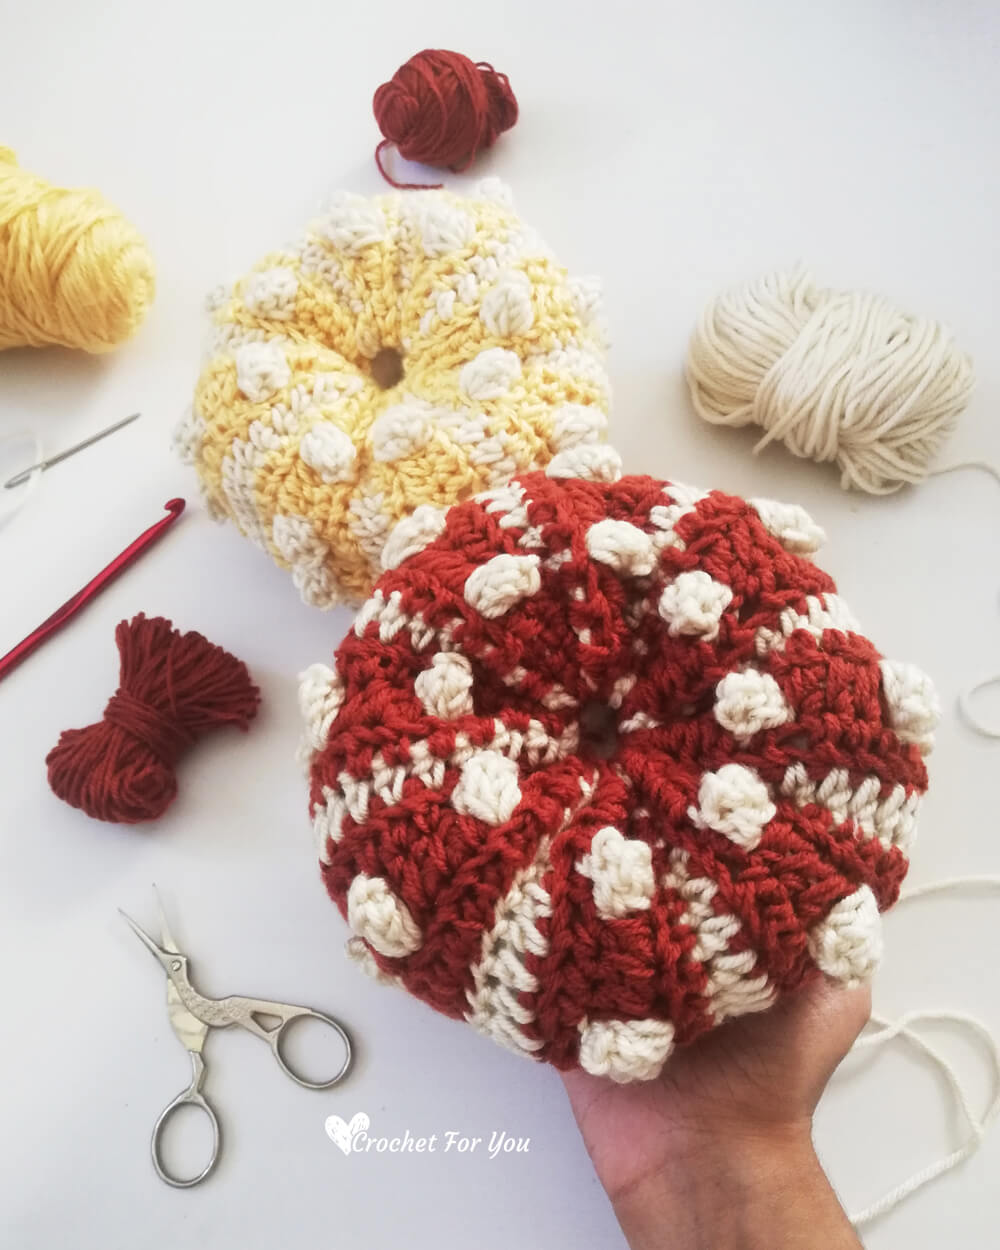
Use up scrap yarn and different weights
This is a fun and easy crochet pumpkin pattern that you can easily make with any type of yarn
That means this pattern great for scrap or leftover yarns. Use variety of yarns and different weight yarns to make different sizes of pumpkins. Mix and match Autumn colors.
See how this Bobbles & Stripes are used in other Christmas projects.
- Santa Helper Hat
- Crochet Bobbles and Stripes Santa Hat
- Crochet Bobbles & Stripes Christmas Tree
- Crochet Bobbles and Stripes Christmas Stockings
Skill level: Intermediate
Finished size: 6″ diameter, 4″ tall
Materials
– #4-Medium / Worsted yarns are more suitable, but you can try other yarns too.
– Yarns in two colors Approx: 150 yards of each color
I used my scrap yarns to make these pumpkins. I have lots of scrap yarn in different weight. So I Used 2 strands of sport weight yarns in brown colors to create worsted weight, and worsted weight in cream and yellow colors.
– I-9, 5.5mm crochet hook
– Fiberfill
– Tapestry needle for weaving ends.
Gauge is not very important for this project. You can use any type of yarns
Abbreviations/special stitches (US Term)
- ch = chain
- sl st = slip stitch
- sc = single crochet
- hdc = half double crochet
- dc = double crochet
- st = stitch
- yo = yarn over
- beg = beginning
- *to; = repeat * to the instructions.
- (C1) = color 1
- (C2) = color 2
Special stitches
4-dc bobble st = [yo, insert the hook in indicated st, yo, pull back through st, yo, pull back through two loops on the hook] 4 times, yarn over, pull back through all the 5 loops on the hook.
Notes
- beg ch does not count as st.
- When crocheting bobbles in contrasting colors make sure to carry unworked yarn along with and work stitches over it.
- See the video tutorial to learn how to crochet bobble in contrasting color.
Video Tutorial
Here is a quick video tutorial to show you how to crochet bobble in contrasting color.
Click here for the left-handed tutorial
How to crochet ribbed pumpkin in any size
– This pattern can be easily adjusted to any size and can be used in any type of yarns.
– The number of foundation chains makes the height of the pumpkin, and the rows make large or small pumpkin.
– Change the height of the pumpkin by crocheting multiple of 4 foundation chains. And make rows (repeat row 2 to 5 continuously) as much as you want to get your desired size of the pumpkin.
Crochet Bobbles & Stripes Pumpkin Pattern
Leaving a long tail about 20″ long, crochet chain 24 with (C1)
Row 1: hdc in each ch across, turn. (23 hdc)
Row 2: with (C1), ch 1, hdc in first st and each of next 2 st, *with (C2) 4-dc Bobble in next st, with (C1) hdc in each of next 3 st; repeat * to across, turn. (18 hdc/5 Bobble)
Row 3: with (C1), ch 1, hdc in each st across, turn. (23 sts)
Row 4: with (C2), ch 1, hdc in each st across, turn. (23 sts)
Row 5: with (C1), ch 1, hdc in each st across, turn. (23 sts)
Row 6: repeat row 2
Row 7: repeat row 3
Row 8: repeat row 4
Row 9: repeat row 5
Row 10: repeat row 2
Row 11: repeat row 3
Row 12: repeat row 4
Row 13: repeat row 5
Row 14: repeat row 2
Row 15: repeat row 3
Row 16: repeat row 4
Row 17: repeat row 5
Row 18: repeat row 2
Row 19: repeat row 3
Row 20: repeat row 4
Row 21: repeat row 5
Row 22: repeat row 2
Row 23: repeat row 3
Row 24: repeat row 4
Row 25: repeat row 5
Row 26: repeat row 2
Row 27: repeat row 3
Row 28: repeat row 4
Row 29: repeat row 5
Row 30: repeat row 2
Row 31: repeat row 3
Row 32: repeat row 4. Fasten off and cut the yarn, leaving a long yarn tail.
Finishing:
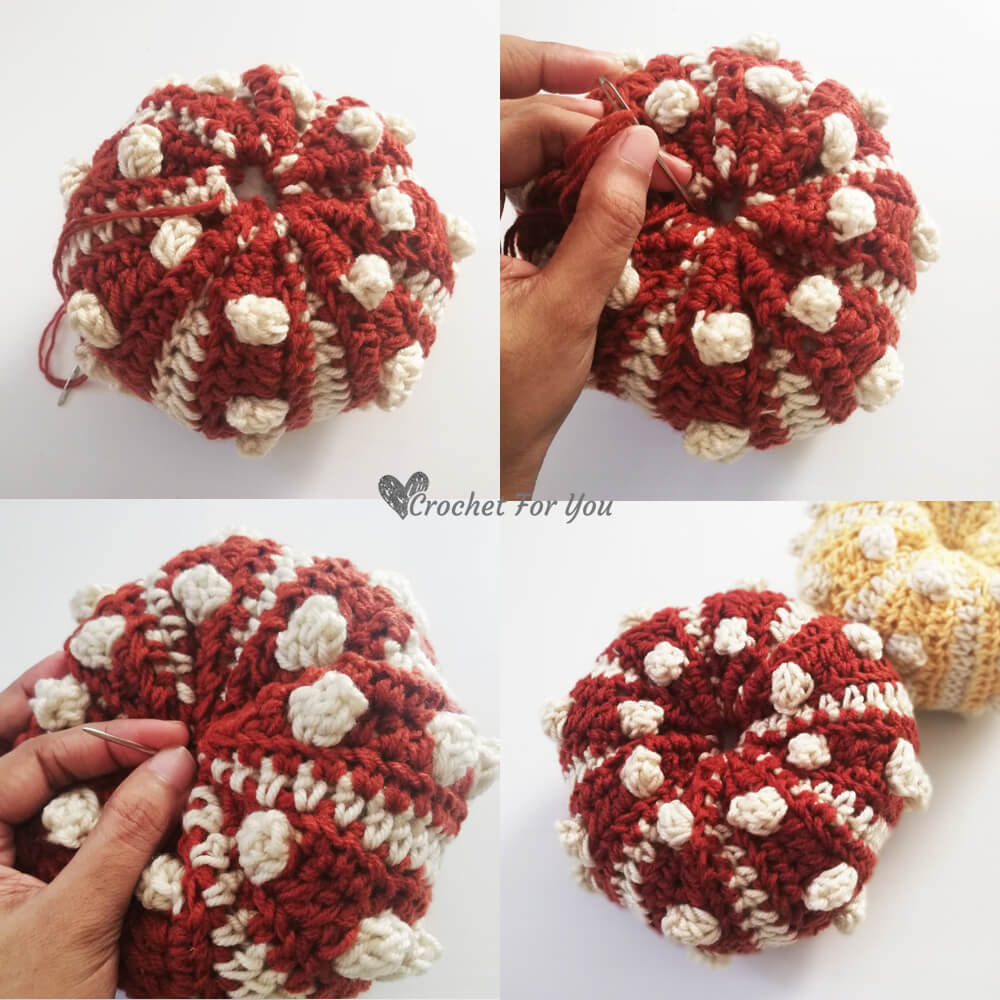
Fold the piece in half and sew with the yarn tail and needle through top loops of both short sides and make it like a tube (Image 1). Tie a knot at the end, do not cut the yarn and start weaving in and out through the stitches around the long side. Pull the yarn tightly and close the bottom with a few more stitches. (Image 2)
Add fiberfill (Image 3). With the yarn tail and needle, weave in and out through the stitches around the long side (Image 4). Pull the yarn and close the top by pulling the yarn tail tightly.
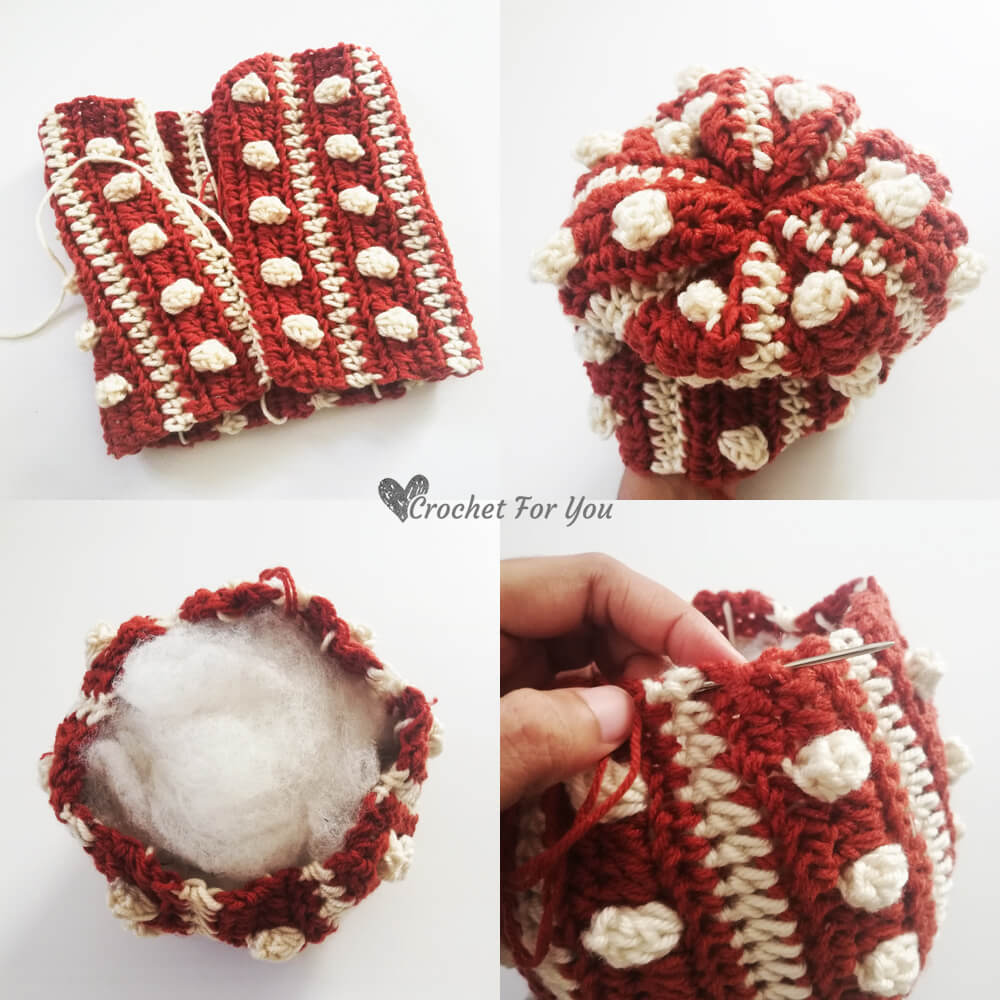
Again, using your yarn tail and the needle, insert the needle through the center of the pumpkin to the other side and pull the yarn tightly. (Image 6)
Insert the yarn tail again through the center to the other side. Pull the yarn tightly to get the shape of a pumpkin as you want. (Image 7 & 8)
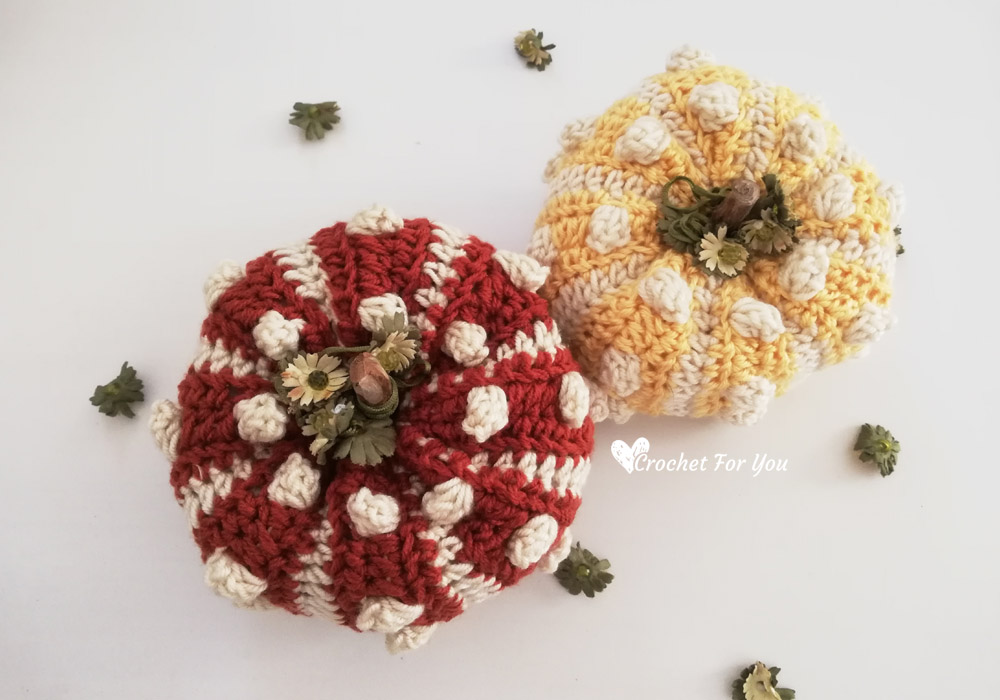
Lastly, Attach the stick with glue. Tie ribbon, twin or any decorative thing around the stick if you want. I tied my old hair band around the stick.

Hope to see you soon with a new FREE pattern
Until then, Happy Crocheting!!
Share your finished projects of this pattern on Crochet For You FB page.
Happy hooking with Crochet For You!!
Let’s connect and share
Facebook | Pinterest | Twitter | Instagram
All contents include photography and patterns are copyrighted Crochet For You by Erangi Udeshika.
Do not copy, edit, distribute or republish patterns and images in this blog in part or whole as your own. Please, share a direct link to the pattern with others and anywhere else. You are welcome to make and sell finished items using my patterns.
Visit Copyright / Terms of use for more info. Thank you.